Android安全- OLLVM 攻略笔记
推荐 原创【Android安全- OLLVM 攻略笔记】此文章归类为:Android安全。
OLLVM 攻略笔记
前言
在现代软件保护技术中,控制流混淆(Control Flow Obfuscation)是一种常见且有效的手段,用于增加逆向工程的难度。OLLVM(Obfuscated LLVM)是基于 LLVM 编译器框架的一个扩展,它通过插入复杂的控制流混淆逻辑,使得生成的二进制代码难以被分析和理解。控制流平坦化(Control Flow Flattening)是 OLLVM 中最具代表性的混淆技术之一,它通过将程序的控制流打散并引入调度器逻辑,极大地增加了逆向工程的复杂性。
本篇笔记将从以下几个方面展开:
- OLLVM 的编译与使用:介绍如何获取、编译和使用 OLLVM 对代码进行混淆。
- OLLVM 混淆技术的分析:深入探讨 OLLVM 的控制流混淆原理,特别是控制流平坦化的实现机制。
- 去除 OLLVM 混淆的实践:结合 IDA Pro、Unicorn 模拟器和 Keypatch 等工具,探索如何有效去除 OLLVM 的混淆逻辑,恢复代码的原始结构。
通过这些内容,希望能够帮助读者更好地理解 OLLVM 的工作原理,并掌握应对复杂混淆技术的分析方法,毕竟有谁能拒绝参加一场顶级玩家之间的攻防游戏呢?
环境配置
| 环境 | 配置 |
|---|---|
| VMware | 16.1.1 build-17801498 |
| Ubuntu | Ubuntu 20.04.2 LTS |
| 物理机内存 | 32G |
| 虚拟机内存 | 16G |
| 物理机储存 | 2T |
| 虚拟机内存 | 1T |
| 目标版本 | llvm-project-9.0 |
配置依赖
1 | sudo apt-get install git-core gnupg flex bison build-essential zip curl zlib1g-dev gcc-multilib g++-multilib libc6-dev-i386 libncurses5 lib32ncurses5-dev x11proto-core-dev libx11-dev lib32z1-dev libgl1-mesa-dev libxml2-utils xsltproc unzip fontconfig libncurses5 cmake ninja-build |
下载 OLLVM 项目
下载网络上大佬开源的 ollvm 项目,goron 是我实际测试比较好用的版本,提供了额外的几种强度不错的混淆 Pass,选择 9.0 版本则是考虑到这个版本网络上可供学习的资料比较多,非常适合学习使用。
1 2 | git clone https://github.com/amimo/goron.gitgit checkout e943a8a78325632df64988e05d66ad5fa0e0c6f6 |
Clion 编译 clang
使用编译器打开 ollvm/llvm-project-9.0.1/llvm/CMakeLists.txt
编译器 file — settings — Build,Execution,Deployment — Cmake — Cmake options,配置 Cmake, 添加 Release 选项并设置 CMake options 如下
1-G Ninja-DLLVM_ENABLE_PROJECTS="clang"编译器主界面将工程切换为 clang 并将模式切换为 Release 模式,最后点击运行开始编译
命令行编译 clang
没有 clion的也可以用命令行编译 clang,生成 release 编译配置文件
1 2 3 4 | cd llvm-project-9.0.1mkdir build_releasecd build_releasecmake -G Ninja -DCMAKE_BUILD_TYPE=Release -DLLVM_ENABLE_PROJECTS="clang" ../llvm |
编译 release
1 | ninja -j16 |
将 ndk 中的 clang 加入环境变量
1 | export PATH=/home/lxz/ollvm/llvm-project/build_release/bin:$PATH |
测试 clang
将 clang 添加到临时环境变量中
1 | export PATH=/home/lxz/ollvm/llvm-project/cmake-build-release/bin::$PATH |
测试编译
1 | clang hello.c -o hello |
交叉编译 arm64 需要先安装 gcc-aarch64 和 g++-aarch64
1 | sudo apt install gcc-aarch64-linux-gnu g++-aarch64-linux-gnu |
交叉编译 arm64
1 | clang hello.c -o hello -target aarch64-linux-gnu |
编译过程
格式
c
在 LLVM 编译过程中,首先需要将 .c 文件通过前端编译器(如 Clang)转换为 LLVM IR(中间表示)。
ll
LLVM Assembly 文件是一种类似于汇编语言的中间表示。它是一种人类可读的文本格式,用于表示 LLVM IR。这种格式在跨平台上具有一定的可移植性。
bc
LLVM Bitcode 文件是一种中间表示的二进制格式,具有跨平台和跨编译器的特性。.bc 文件包含了经过前端编译器生成的 LLVM IR,但已经被编译成了一种更加紧凑的二进制形式。
s
汇编语言文件 .s 文件是汇编语言程序的源代码文件,包含了目标机器的汇编指令。在 LLVM 编译过程的最后阶段,LLVM IR 会被转换为特定目标机器的汇编代码,存储在 .s 文件中。这种格式通常不跨平台,因为汇编指令是特定于目标体系结构的。
指令
生成 ll 文件
1 2 | export PATH=~/ollvm/llvm-project-9.0.1/llvm/cmake-build-release/bin::$PATHclang -emit-llvm -S hello.c -o hello.ll |
ll 文件也是可以执行的(需要在clion中先将 lli 编译出来)
1 | lli hello.ll |
生成 bc 文件(需要在clion中先将 llvm-as 编译出来)
1 | llvm-as hello.ll -o hello.bc |
生成 s 文件 (需要在clion中先将 llc 编译出来)
1 | llc hello.bc -o hello.s |
s 文件生成可执行文件
1 | clang hello.s -o hello_s |
bc 文件生成可执行文件
1 | clang hello.bc -o hello_bc |
ll 文件生成可执行文件
1 | clang hello.ll -o hello_ll |
AndroidStudio 中使用 ollvm
下载 android-ndk-r21e
1 2 | wget https://dl.google.com/android/repository/android-ndk-r21e-linux-x86_64.zipunzip android-ndk-r21e-linux-x86_64.zip |
将之前编译的 ollvm 中的 lib 和 bin 文件夹拷贝到 ndk 文件夹中
1 2 | cp /home/lxz/ollvm/llvm-project/build_debug/lib /home/lxz/ollvm/android-ndk-r21e/toolchains/llvm/prebuilt/linux-x86_64/libcp /home/lxz/ollvm/llvm-project/build_debug/bin /home/lxz/ollvm/android-ndk-r21e/toolchains/llvm/prebuilt/linux-x86_64/bin |
在 android studio 工程中 local.properties 中自定义 ndk 路径
1 | ndk.dir =/home/lxz/ollvm/android-ndk-r21e |
在 CMakeLists.txt 中添加编译时使用的 ollvm 命令
1 2 3 4 5 6 7 8 | # 只开启控制流平坦化add_definitions(-mllvm -fla)# 开启指令替换、控制流平坦化、虚假控制流add_definitions(-mllvm -sub -mllvm -bcf -mllvm -fla)# 指定控制流平坦化和虚假控制流的次数 add_definitions(-mllvm -sub -mllvm -sub_loop=3 -mllvm -bcf -mllvm -bcf_loop=3 -mllvm -fla -mllvm -split_num=3) |
IR 汇编学习
这部分除了理解 IR 汇编的基本语法,还必须理解 IR 语言中代码块的概念,这样我们才能理解 OLLVM 中最难的控制流平坦化的技术原理
加减语法
C 代码
1 2 3 | int fun1(int a, int b){ return a+b;} |
IR 汇编
; dso_local:这是一个链接属性,表示该函数是局部的,仅在当前模块中可见。
; i32:表示函数的返回类型是 32 位整数。
;@_Z4fun1ii(i32, i32):这是函数的名称和参数列表,@ 是函数名的标识符。
;#0:这是一个属性组的引用,表示该函数具有一些特定的属性(如调用约定等),但具体属性需要查看属性组的定义。
; 参数优先分配 %0、%1、%2、%3 ...
define dso_local i32 @_Z4fun1ii(i32, i32) #0 {

  ; 在栈上分配一个 i32 类型的内存空间,对齐到 4 字节边界,标记为 %3
  %3 = alloca i32, align 4

  ; 在栈上分配一个 i32 类型的内存空间,对齐到 4 字节边界,标记为 %4
  %4 = alloca i32, align 4

  ; 将 %0 的值存储到 %3 指向的内存中,4 字节对齐
  store i32 %0, i32* %3, align 4

  ; 将 %1 的值存储到 %4 指向的内存中, 4 字节对齐
  store i32 %1, i32* %4, align 4

  ; 从 %3 指向的内存中加载一个 i32 类型的值,存储到临时变量 %5 中,4 字节对齐
  %5 = load i32, i32* %3, align 4

  ; 从 %4 指向的内存中加载一个 i32 类型的值,存储到临时变量 %6 中,4 字节对齐
  %6 = load i32, i32* %4, align 4

  ; 将 %5 和 %6 中的值相加,结果存储到临时变量 %7 中,加法操作不会检查有符号溢出
  %7 = add nsw i32 %5, %6

  ; 返回函数的结果,即 %7 中存储的加法结果
  ret i32 %7
}
循环语法
C 代码
1 2 3 4 5 6 7 | int fun2(int a, int b){ int ret = 0; for(int i = 0; i < 5; i++){ ret += a; } return ret+b;} |
IR 汇编
define dso_local i32 @_Z4fun2ii(i32, i32) #0 {
  %3 = alloca i32, align 4			(参数1)
  %4 = alloca i32, align 4			(参数2)
  %5 = alloca i32, align 4			(中间计算结果)
  %6 = alloca i32, align 4			(循环计数器)
  store i32 %0, i32* %3, align 4
  store i32 %1, i32* %4, align 4
  store i32 0, i32* %5, align 4
  store i32 0, i32* %6, align 4

  ; 无条件跳转到标签 %7,开始循环
  br label %7

;这部分对应 i < 5
7:                                                ; preds = %14, %2
  %8 = load i32, i32* %6, align 4

  ; 比较 %8 是否小于 5,结果存放到 %9,%9 为布尔值
  ; %9 = (bool)(%8 < 5)
  %9 = icmp slt i32 %8, 5

  ; 根据比较结果布尔类型的 %9 跳转到标签 %10 或 %17
  ; if(%9){
  ;		br label %10
  ;	}else{
  ;		br label %17
  ;	}
  br i1 %9, label %10, label %17

; 这部分对应 ret += a
10:                                               ; preds = %7
  ; 从 %3 指向的内存中加载第一个参数的值
  %11 = load i32, i32* %3, align 4

  ; 从 %5 指向的内存中加载中间计算结果的值
  %12 = load i32, i32* %5, align 4

  ; 将中间计算结果 %12 和第一个参数 %11 相加,结果存储到 %13
  %13 = add nsw i32 %12, %11

  ; 将新的中间计算结果 %13 存储到 %5 指向的内存中
  store i32 %13, i32* %5, align 4

  ; 跳转到标签 %14,继续循环
  br label %14

; 这部分对应 i++
14:                                               ; preds = %10
  ; 从 %6 指向的内存中加载循环计数器的值
  %15 = load i32, i32* %6, align 4

  ; 将循环计数器 %15 加 1,结果存储到 %16
  %16 = add nsw i32 %15, 1

  ; 将新的循环计数器值 %16 存储到 %6 指向的内存中
  store i32 %16, i32* %6, align 4

  ; 跳转回标签 %7,继续循环
  br label %7

;这部分对应 return ret+b;
17:                                               ; preds = %7

  ; 从 %5 指向的内存中加载最终的中间计算结果
  %18 = load i32, i32* %5, align 4

  ; 从 %4 指向的内存中加载第二个参数的值
  %19 = load i32, i32* %4, align 4

  ; 将中间计算结果 %18 和第二个参数 %19 相加,结果存储到 %20
  %20 = add nsw i32 %18, %19

  ; 返回函数的结果,即 %20 中存储的值
  ret i32 %20
}
调用语法
C 代码
1 2 3 | int fun3(int a, int b){ return fun2(a, b);} |
IR 汇编
define dso_local i32 @_Z4fun3ii(i32, i32) #0 {
  %3 = alloca i32, align 4
  %4 = alloca i32, align 4
  store i32 %0, i32* %3, align 4
  store i32 %1, i32* %4, align 4
  %5 = load i32, i32* %3, align 4
  %6 = load i32, i32* %4, align 4
  ; 调用函数 _Z4fun2ii,将 %5 和 %6 作为参数传递,返回值存储到临时变量 %7 中
  %7 = call i32 @_Z4fun2ii(i32 %5, i32 %6)
  ret i32 %7
}
分支语法
C 代码
1 2 3 4 5 6 7 | int fun4(int a, int b){ if(a > 5){ return fun2(a, b); }else{ return fun3(a, b); }} |
IR 汇编
define dso_local i32 @_Z4fun4ii(i32, i32) #0 {
  %3 = alloca i32, align 4
  %4 = alloca i32, align 4
  %5 = alloca i32, align 4
  store i32 %0, i32* %4, align 4
  store i32 %1, i32* %5, align 4
  %6 = load i32, i32* %4, align 4
  %7 = icmp sgt i32 %6, 5
  br i1 %7, label %8, label %12

8:                                                ; preds = %2
  %9 = load i32, i32* %4, align 4
  %10 = load i32, i32* %5, align 4
  %11 = call i32 @_Z4fun2ii(i32 %9, i32 %10)
  store i32 %11, i32* %3, align 4
  br label %16

12:                                               ; preds = %2
  %13 = load i32, i32* %4, align 4
  %14 = load i32, i32* %5, align 4
  %15 = call i32 @_Z4fun3ii(i32 %13, i32 %14)
  store i32 %15, i32* %3, align 4
  br label %16

16:                                               ; preds = %12, %8
  %17 = load i32, i32* %3, align 4
  ret i32 %17
}
OLLVM 源码分析
这里只给出笔者认为比较重要的代码片段,其中注释多为 AI 分析(让 AI 辅助我们理解复杂的工程是个很棒的主意),也包含少量的笔者在分析时插入的日志 LOG,笔者总结的经验就是在分析的时候多插入LOG,在关键代码前后多打印对应的 IR 汇编,对比前后的区别,将下面的任意一个 Pass 分析透彻后,熟悉了 LLVM 操作 IR 汇编的函数,接下来的源码分析会越来越得心应手。
IndirectCall.cpp
核心功能:加密函数调用地址,将 bl lable 指令转变为 blr reg
1 2 3 4 5 6 7 8 9 10 11 12 13 14 15 16 17 18 19 20 21 22 23 24 25 26 27 28 29 30 31 32 33 34 35 36 37 38 39 40 41 42 43 44 45 46 47 48 49 50 51 52 53 54 55 56 57 58 59 60 61 62 63 64 65 66 67 68 69 70 71 72 73 74 75 76 77 78 79 80 81 82 83 84 85 86 87 88 89 90 91 92 93 94 95 96 97 98 99 100 101 102 103 104 105 106 107 108 109 110 111 112 113 114 115 116 117 118 119 120 121 122 123 124 125 | bool runOnFunction(Function &Fn) override { if (!toObfuscate(flag, &Fn, "icall")) { // 如果不需要混淆,返回 false return false; } if (Options && Options->skipFunction(Fn.getName())) { // 如果选项中跳过该函数,返回 false return false; } LLVMContext &Ctx = Fn.getContext(); // 获取上下文 CalleeNumbering.clear(); // 清空被调用函数编号映射 Callees.clear(); // 清空被调用函数集合 CallSites.clear(); // 清空调用指令集合 NumberCallees(Fn); // 为函数的被调用者编号 if (Callees.empty()) { // 如果没有被调用函数,返回 false return false; } uint32_t V = RandomEngine.get_uint32_t() & ~3; // 生成随机数 ConstantInt *EncKey = ConstantInt::get(Type::getInt32Ty(Ctx), V, false); // 创建加密密钥常量 const IPObfuscationContext::IPOInfo *SecretInfo = nullptr; // 混淆信息指针 if (IPO) { // 如果有 IP 混淆上下文 SecretInfo = IPO->getIPOInfo(&Fn); // 获取 IP 信息 } Value *MySecret; if (SecretInfo) { // 如果有混淆信息 MySecret = SecretInfo->SecretLI; // 使用混淆信息中的值 } else { MySecret = ConstantInt::get(Type::getInt32Ty(Ctx), 0, true); // 否则使用 0 } ConstantInt *Zero = ConstantInt::get(Type::getInt32Ty(Ctx), 0); // 创建零常量 GlobalVariable *Targets = getIndirectCallees(Fn, EncKey); // 获取间接被调用者全局变量 for (auto CI : CallSites) { // 遍历调用指令集合 SmallVector<Value *, 8> Args; // 参数集合 SmallVector<AttributeSet, 8> ArgAttrVec; // 参数属性集合 CallSite CS(CI); // 创建调用站点 Instruction *Call = CS.getInstruction(); // 获取调用指令 Function *Callee = CS.getCalledFunction(); // 获取被调用函数 FunctionType *FTy = CS.getFunctionType(); // 获取函数类型 IRBuilder<> IRB(Call); // 创建 IR 构建器 Args.clear(); // 清空参数集合 ArgAttrVec.clear(); // 清空参数属性集合 Value *Idx = ConstantInt::get(Type::getInt32Ty(Ctx), CalleeNumbering[CS.getCalledFunction()]); // 获取被调用函数编号 Value *GEP = IRB.CreateGEP(Targets, {Zero, Idx}); // 创建元素指针获取指令 LoadInst *EncDestAddr = IRB.CreateLoad(GEP, CI->getName()); // 创建加载指令 Constant *X; if (SecretInfo) { // 如果有混淆信息 X = ConstantExpr::getSub(SecretInfo->SecretCI, EncKey); // 计算表达式 } else { X = ConstantExpr::getSub(Zero, EncKey); // 计算表达式 } const AttributeList &CallPAL = CS.getAttributes(); // 获取调用属性列表 CallSite::arg_iterator I = CS.arg_begin(); // 参数迭代器 unsigned i = 0; for (unsigned e = FTy->getNumParams(); i != e; ++I, ++i) { // 遍历参数 Args.push_back(*I); // 添加参数到集合 AttributeSet Attrs = CallPAL.getParamAttributes(i); // 获取参数属性 ArgAttrVec.push_back(Attrs); // 添加参数属性到集合 } for (CallSite::arg_iterator E = CS.arg_end(); I != E; ++I, ++i) { // 遍历剩余参数 Args.push_back(*I); // 添加参数到集合 ArgAttrVec.push_back(CallPAL.getParamAttributes(i)); // 添加参数属性到集合 } AttributeList NewCallPAL = AttributeList::get( // 创建新的调用属性列表 IRB.getContext(), CallPAL.getFnAttributes(), CallPAL.getRetAttributes(), ArgAttrVec); Value *Secret = IRB.CreateSub(X, MySecret); // 创建减法指令 Value *DestAddr = IRB.CreateGEP(EncDestAddr, Secret); // 创建元素指针获取指令 // add 进一步增加 icall 的运算复杂度 // 对 MySecret 进行一系列复杂的运算 Value *Value1 = IRB.CreateAdd(MySecret, ConstantInt::get(Type::getInt32Ty(Fn.getContext()), V)); Value *Value2 = IRB.CreateSub(MySecret, ConstantInt::get(Type::getInt32Ty(Fn.getContext()), V)); // 进一步增加复杂性 Value *Value3 = IRB.CreateMul(Value1, ConstantInt::get(Type::getInt32Ty(Fn.getContext()), V)); Value *Value4 = IRB.CreateMul(Value2, ConstantInt::get(Type::getInt32Ty(Fn.getContext()), V)); // 使用位运算 Value *Value5 = IRB.CreateShl(Value3, ConstantInt::get(Type::getInt32Ty(Fn.getContext()), 2)); // 左移 2 位 Value *Value6 = IRB.CreateLShr(Value4, ConstantInt::get(Type::getInt32Ty(Fn.getContext()), 3)); // 逻辑右移 3 位 // 最终结果 Value *FinalValue1 = IRB.CreateAdd(Value5, ConstantInt::get(Type::getInt32Ty(Fn.getContext()), V)); Value *FinalValue2 = IRB.CreateSub(Value6, ConstantInt::get(Type::getInt32Ty(Fn.getContext()), V)); // 创建比较指令,比较 FinalValue1 和 FinalValue2 是否相等 Value *CmpResult = IRB.CreateICmpEQ(FinalValue1, FinalValue2); // 将 FinalValue1 转换为 i8* 类型的指针 Value *FinalValue1AsPtr = IRB.CreateIntToPtr(FinalValue1, Type::getInt8PtrTy(Fn.getContext())); // 使用 CreateSelect 生成 Result,确保 TrueValue 和 FalseValue 的类型一致 Value *Result = IRB.CreateSelect(CmpResult, FinalValue1AsPtr, DestAddr); DestAddr = Result; // add Value *FnPtr = IRB.CreateBitCast(DestAddr, FTy->getPointerTo()); // 创建位转换指令 FnPtr->setName("Call_" + Callee->getName()); // 设置名称 CallInst *NewCall = IRB.CreateCall(FTy, FnPtr, Args, Call->getName()); // 创建新的调用指令 NewCall->setAttributes(NewCallPAL); // 设置属性 Call->replaceAllUsesWith(NewCall); // 替换所有使用 Call->eraseFromParent(); // 从父基本块中移除 } return true; // 返回 true} |
IndirectBranch.cpp
核心功能:加密块间的调用地址,将 b lable 指令转变为 br reg
1 2 3 4 5 6 7 8 9 10 11 12 13 14 15 16 17 18 19 20 21 22 23 24 25 26 27 28 29 30 31 32 33 34 35 36 37 38 39 40 41 42 43 44 45 46 47 48 49 50 51 52 53 54 55 56 57 58 59 60 61 62 63 64 65 66 67 68 69 70 71 72 73 74 75 76 77 78 79 80 81 82 83 84 85 86 87 88 89 90 91 92 93 94 95 96 97 | // 重写 runOnFunction 方法,用于对每个函数进行处理bool runOnFunction(Function &Fn) override { // 判断是否需要进行混淆 if (!toObfuscate(flag, &Fn, "indbr")) { return false; } // 如果混淆选项中指定了跳过该函数,则返回 if (Options && Options->skipFunction(Fn.getName())) { return false; } // 如果函数为空、具有链接一次的链接类型或属于启动代码段,则跳过 if (Fn.getBasicBlockList().empty() || Fn.hasLinkOnceLinkage() || Fn.getSection() == ".text.startup") { return false; } LLVMContext &Ctx = Fn.getContext(); // 获取 LLVM 上下文 // 初始化成员变量 BBNumbering.clear(); BBTargets.clear(); // 分裂所有临界边,避免间接分支指令无法处理的情况 SplitAllCriticalEdges(Fn, CriticalEdgeSplittingOptions(nullptr, nullptr)); NumberBasicBlock(Fn); // 为基本块编号 // 如果没有可处理的基本块,则返回 if (BBNumbering.empty()) { return false; } // 生成随机加密密钥 uint32_t V = RandomEngine.get_uint32_t() & ~3; ConstantInt *EncKey = ConstantInt::get(Type::getInt32Ty(Ctx), V, false); // 获取 IPO 混淆信息 const IPObfuscationContext::IPOInfo *SecretInfo = nullptr; if (IPO) { SecretInfo = IPO->getIPOInfo(&Fn); } // 获取混淆值 Value *MySecret; if (SecretInfo) { MySecret = SecretInfo->SecretLI; } else { MySecret = ConstantInt::get(Type::getInt32Ty(Ctx), 0, true); } // 创建间接分支目标的全局变量 ConstantInt *Zero = ConstantInt::get(Type::getInt32Ty(Ctx), 0); GlobalVariable *DestBBs = getIndirectTargets(Fn, EncKey); // 遍历函数中的每个基本块 for (auto &BB : Fn) { auto *BI = dyn_cast<BranchInst>(BB.getTerminator()); // 获取分支指令 if (BI && BI->isConditional()) { // 如果是条件分支 IRBuilder<> IRB(BI); // 创建 IR 构建器 Value *Cond = BI->getCondition(); // 获取分支条件 Value *Idx; // 用于间接分支的索引 Value *TIdx, *FIdx; // 真分支和假分支的索引 // 获取真分支和假分支的编号 TIdx = ConstantInt::get(Type::getInt32Ty(Ctx), BBNumbering[BI->getSuccessor(0)]); FIdx = ConstantInt::get(Type::getInt32Ty(Ctx), BBNumbering[BI->getSuccessor(1)]); // 根据条件选择索引 Idx = IRB.CreateSelect(Cond, TIdx, FIdx); // 计算目标地址 Value *GEP = IRB.CreateGEP(DestBBs, {Zero, Idx}); LoadInst *EncDestAddr = IRB.CreateLoad(GEP, "EncDestAddr"); // 计算解密密钥 Constant *X; if (SecretInfo) { X = ConstantExpr::getSub(SecretInfo->SecretCI, EncKey); } else { X = ConstantExpr::getSub(Zero, EncKey); } Value *DecKey = IRB.CreateSub(X, MySecret); // 解密目标地址 Value *DestAddr = IRB.CreateGEP(EncDestAddr, DecKey); // 创建间接分支指令并替换原来的分支指令 IndirectBrInst *IBI = IndirectBrInst::Create(DestAddr, 2); IBI->addDestination(BI->getSuccessor(0)); IBI->addDestination(BI->getSuccessor(1)); ReplaceInstWithInst(BI, IBI); } } return true; // 表示对函数进行了修改} |
Flattening.cpp
核心功能:控制流平坦化,OLLVM 中最核心的保护手段,将函数中的所有代码块编号放到一个巨大的 while switch case 中进行分发执行
1 2 3 4 5 6 7 8 9 10 11 12 13 14 15 16 17 18 19 20 21 22 23 24 25 26 27 28 29 30 31 32 33 34 35 36 37 38 39 40 41 42 43 44 45 46 47 48 49 50 51 52 53 54 55 56 57 58 59 60 61 62 63 64 65 66 67 68 69 70 71 72 73 74 75 76 77 78 79 80 81 82 83 84 85 86 87 88 89 90 | bool Flattening::flatten(Function *f) { vector<BasicBlock *> origBB; // 存储原始基本块 BasicBlock *loopEntry; // 进入循环的基本块 BasicBlock *loopEnd; // 退出循环的基本块 LoadInst *load; // switch 变量的加载指令 SwitchInst *switchI; // switch 指令 AllocaInst *switchVar; // switch 变量的存储位置 // 生成一个随机的加扰密钥 char scrambling_key[16]; llvm::cryptoutils->get_bytes(scrambling_key, 16); // 降低 switch 复杂度,使用不同 LLVM 版本的适配#if LLVM_VERSION_MAJOR * 10 + LLVM_VERSION_MINOR >= 90 FunctionPass *lower = createLegacyLowerSwitchPass();#else FunctionPass *lower = createLowerSwitchPass();#endif lower->runOnFunction(*f); // 遍历所有基本块,并存储到 origBB for (Function::iterator i = f->begin(); i != f->end(); ++i) { BasicBlock *tmp = &*i; origBB.push_back(tmp); if (isa<InvokeInst>(tmp->getTerminator())) { return false; // 遇到 invoke 指令,终止混淆 } } // 如果基本块数量小于等于1,无需平坦化 if (origBB.size() <= 1) { return false; } LLVMContext &Ctx = f->getContext(); // 获取 LLVM 上下文 const IPObfuscationContext::IPOInfo *SecretInfo = nullptr; if (IPO) { SecretInfo = IPO->getIPOInfo(f); // 获取 IPO 相关信息 } Value *MySecret = SecretInfo ? SecretInfo->SecretLI : ConstantInt::get(Type::getInt32Ty(Ctx), 0); // 移除第一个基本块 origBB.erase(origBB.begin()); // 处理第一个基本块,确保其可以被 switch 控制 Function::iterator tmp = f->begin(); BasicBlock *insert = &*tmp; if (isa<BranchInst>(insert->getTerminator()) && insert->getTerminator()->getNumSuccessors() > 1) { BasicBlock::iterator i = insert->end(); --i; if (insert->size() > 1) { --i; } BasicBlock *tmpBB = insert->splitBasicBlock(i, "first"); origBB.insert(origBB.begin(), tmpBB); } insert->getTerminator()->eraseFromParent(); // 创建 switch 变量并初始化 switchVar = new AllocaInst(Type::getInt32Ty(f->getContext()), 0, "switchVar", insert); new StoreInst(ConstantInt::get(Type::getInt32Ty(f->getContext()), llvm::cryptoutils->scramble32(0, scrambling_key)), switchVar, insert); // 创建控制流平坦化的循环结构 loopEntry = BasicBlock::Create(f->getContext(), "loopEntry", f, insert); loopEnd = BasicBlock::Create(f->getContext(), "loopEnd", f, insert); load = new LoadInst(switchVar, "switchVar", loopEntry); insert->moveBefore(loopEntry); BranchInst::Create(loopEntry, insert); BranchInst::Create(loopEntry, loopEnd); // 创建 switch 语句 BasicBlock *swDefault = BasicBlock::Create(f->getContext(), "switchDefault", f, loopEnd); BranchInst::Create(loopEnd, swDefault); switchI = SwitchInst::Create(load, swDefault, 0, loopEntry); // 处理基本块跳转 for (BasicBlock *bb : origBB) { bb->moveBefore(loopEnd); ConstantInt *numCase = ConstantInt::get(switchI->getCondition()->getType(), llvm::cryptoutils->scramble32(switchI->getNumCases(), scrambling_key)); switchI->addCase(numCase, bb); } fixStack(f); // 修正栈结构 lower->runOnFunction(*f); delete lower; return true;} |
OLLVM 反混淆
环境配置
| 环境 | 配置 |
|---|---|
| 操作系统 | Windows 10 |
| IDA 版本 | 7.7 |
| Python | 3.10.7 |
| unicorn | 2.1.1 |
| keystone-engine | 0.9.2 |
Unicorn
Unicorn 是一个模拟 CPU 执行的框架,Unicorn 在 OLLVM 反混淆中的作用为计算 BR 寄存器的值以及控制流平坦化中作为 SWITCH ID 的寄存器的值,这里附上一段笔者学习 Unicorn 的代码,希望可以帮助大家理解 Unicorn 的用法。
1 2 3 4 5 6 7 8 9 10 11 12 13 14 15 16 17 18 19 20 21 22 23 24 25 26 27 28 29 30 31 32 33 34 35 36 37 38 39 40 41 42 43 44 45 46 47 48 49 50 51 52 53 54 55 56 57 58 59 60 61 62 63 64 65 66 67 68 69 70 71 72 73 74 75 76 | import unicorn # 导入 Unicorn 库import capstone # 导入 Capstone 库import binascii # 导入 binascii 库# 定义一个函数 print_regs,用于打印寄存器的值def print_regs(mu): for i in range(unicorn.arm64_const.UC_ARM64_REG_X0, unicorn.arm64_const.UC_ARM64_REG_X30 + 1): # 遍历 X0-X30 print('X%d: 0x%x' % (i - unicorn.arm64_const.UC_ARM64_REG_X0, mu.reg_read(i)))# 定义一个回调函数 hook_code,用于在代码执行时触发def hook_code(mu, addr, size, user_data): print('-------hook code start-------') code = mu.mem_read(addr, size) # 读取内存中的代码 cp = capstone.Cs(capstone.CS_ARCH_ARM64, capstone.CS_MODE_ARM) # 初始化 Capstone 模块 for i in cp.disasm(code, addr): # 反汇编代码 print('[addr:0x%x]: %s %s' % (i.address, i.mnemonic, i.op_str)) print_regs(mu) # 打印寄存器的值# 定义一个回调函数 hook_mem_write,用于在内存写入时触发def hook_mem_write(mu, type, addr, size, value, user_data): print('-------hook mem write-------') if type == unicorn.UC_MEM_WRITE: # 如果是内存写入事件 print('memory write addr:0x%x size:%x value:0x%x' % (addr, size, value))# 定义一个回调函数 hook_intr,用于在中断发生时触发def hook_intr(mu, intno, user_data): print('-------hook intr start-------') print_regs(mu) # 打印寄存器的值# 定义一个测试函数 test_arm64def test_arm64(): # 定义一段 ARM64 指令集的代码 code = b'\xe0\x03\x1f\xaa' # mov x0, xzr (示例指令,可替换) # 初始化 Unicorn 模块 mu = unicorn.Uc(unicorn.UC_ARCH_ARM64, unicorn.UC_MODE_ARM) # 定义内存地址、大小 addr = 0x1000 size = 0x1000 # 映射内存并将代码写入内存 mu.mem_map(addr, size) mu.mem_write(addr, code) # 读取内存中的代码并打印 code_bytes = mu.mem_read(addr, len(code)) print('addr:0x%x, content:%s' % (addr, binascii.b2a_hex(code_bytes))) # 设置寄存器的值 mu.reg_write(unicorn.arm64_const.UC_ARM64_REG_X0, 0x100) mu.reg_write(unicorn.arm64_const.UC_ARM64_REG_X1, 0x200) mu.reg_write(unicorn.arm64_const.UC_ARM64_REG_X2, 0x300) mu.reg_write(unicorn.arm64_const.UC_ARM64_REG_X3, 0x400) # 监听代码执行事件 mu.hook_add(unicorn.UC_HOOK_CODE, hook_code) # 监听内存写入事件 mu.hook_add(unicorn.UC_HOOK_MEM_WRITE, hook_mem_write) # 监听中断事件 mu.hook_add(unicorn.UC_HOOK_INTR, hook_intr) try: # 开始模拟执行代码 mu.emu_start(addr, addr + len(code)) except unicorn.UcError as e: print(e) # 读取内存中的数据并打印 stack_bytes = mu.mem_read(addr, 4) print("mem:0x%x, value:%s" % (addr, binascii.b2a_hex(stack_bytes)))if __name__ == '__main__': test_arm64() |
flare-emu
flare-emu 的核心功能是通过 Unicorn 的仿真能力,为 IDA 二进制分析提供强大的动态仿真支持。它支持多种架构(包括 x86、x86_64、ARM 和 ARM64),并提供了五种主要的仿真接口,以及一系列相关的辅助和实用函数。
emulateRange- 用于仿真指定范围内的指令或函数。
- 支持用户定义的指令钩子和“调用”指令钩子。
- 用户可以指定寄存器和堆栈参数的值。
- 如果提供字节字符串,会将其写入仿真器的内存,并将指针写入寄存器或堆栈变量。
- 提供了从仿真内存或寄存器读取数据的实用函数。
iterate- 强制仿真进入指定函数内的特定分支,以达到给定的目标地址。
- 用户可以指定目标地址列表,或从函数的交叉引用中获取目标地址。
- 提供了用户定义的指令和“调用”指令钩子。
iterateAllPaths- 尝试找到并仿真目标函数的所有路径。
- 适用于需要覆盖函数中所有基本块的代码分析场景。
emulateBytes- 用于仿真一段独立的代码(如 shellcode)。
- 提供的字节不会添加到 IDB 中,而是直接仿真。
emulateFrom- 从指定地址开始仿真,直到没有更多指令可仿真,或在钩子中停止仿真。
- 支持动态代码发现,适用于边界不明确的函数或混淆代码。
项目地址:a7cK9s2c8@1M7s2y4Q4x3@1q4Q4x3V1k6Q4x3V1k6Y4K9i4c8Z5N6h3u0Q4x3X3g2U0L8$3#2Q4x3V1k6E0j5h3&6V1K9h3q4F1N6q4)9J5c8X3k6D9j5i4u0W2i4K6u0V1k6h3#2#2i4K6u0W2k6$3W2@1
构建测试用例
C 代码
1 2 3 4 5 6 7 8 9 10 11 12 13 14 15 16 17 18 19 20 21 22 23 | #include <stdio.h>int add(int a, int b){ return a + b;}int add5(int a, int b){ int ret = 0; for (int i = 0; i < 5; i++){ if(b > 10){ ret -= add(a, b); }else{ ret += add(a, b); } } return ret;}int main() { int ret = add5(1, 2); printf("add5 ret %d", ret); return 0;} |
编译三种混淆的二进制文件
1 2 3 4 5 | clang main.cpp -o main_icall -target aarch64-linux-gnu -mllvm -irobf-icallclang main.cpp -o main_indbr -target aarch64-linux-gnu -mllvm -irobf-indbrclang main.cpp -o main_cff -target aarch64-linux-gnu -mllvm -irobf-cff |
对抗加密函数调用地址
混淆效果
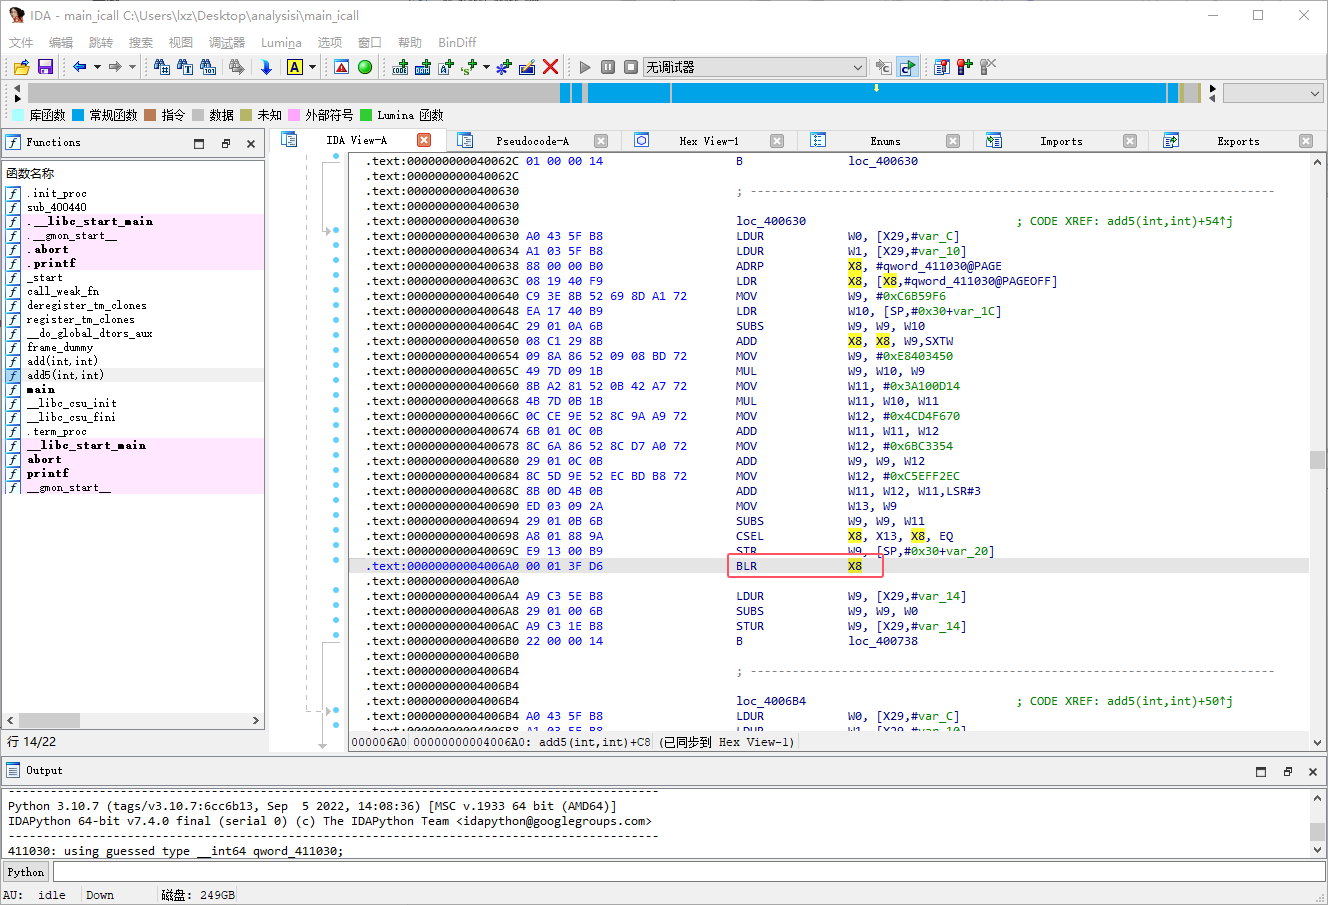
IDA 打开 main_icall 中的 main 函数可以发现函数 add5 的跳转已经被加密
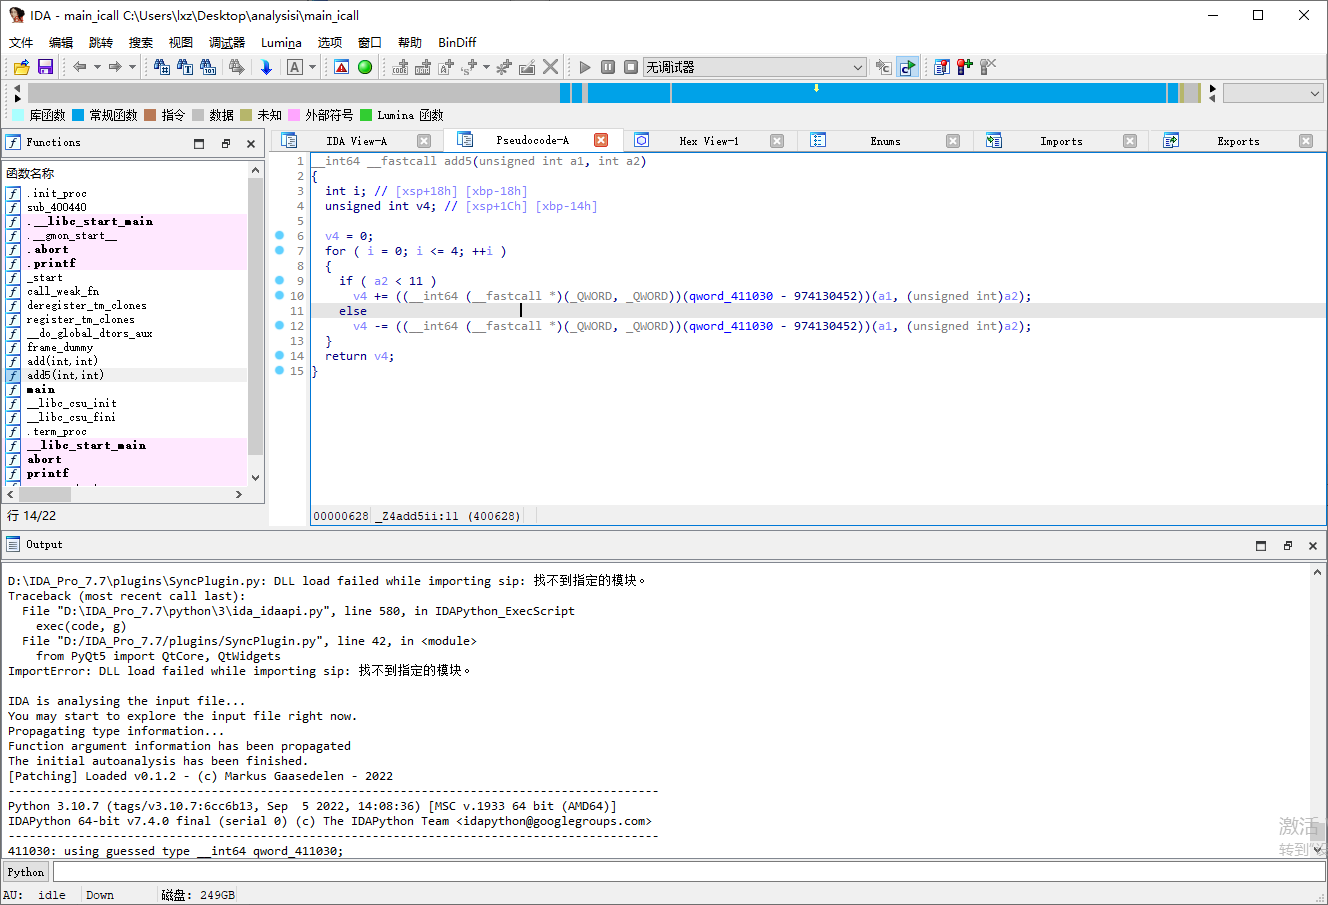
分析思路
这里我们可以发现原本的 BL 指令被替换成了 BLR 指令,这里我们只需要利用 flare_emu模拟执行一下函数,利用 iterate 方法强行执行到目标地址就可以获取目标寄存器的值了,在最后将 BLR 指令改回 BL 指令就可以了
根据观察,函数跳转的地址通过模拟执行还是比较好计算出来的,这里我的思路如下:
使用 flare_emu 的 iterate 方法,从指定的地址范围开始模拟执行
targetCallBack 回调中记录每个间接调用指令的目标地址
修复间接调用
示例代码
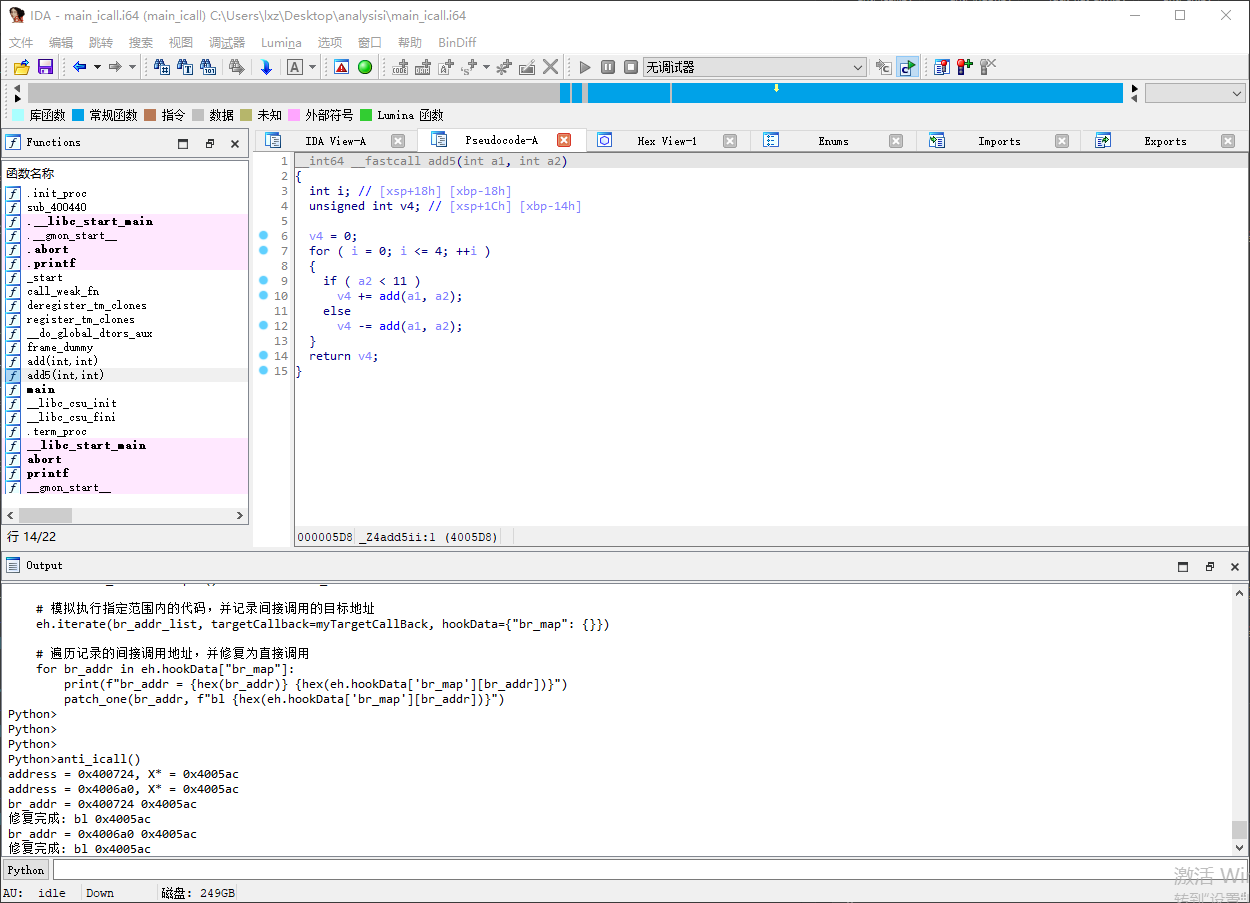
1 2 3 4 5 6 7 8 9 10 11 12 13 14 15 16 17 18 19 20 21 22 23 24 25 26 27 28 29 30 31 32 33 34 35 36 37 38 39 40 41 42 43 44 45 46 47 48 49 50 51 52 53 54 55 56 57 58 59 60 61 62 63 64 65 66 67 68 69 70 71 72 73 74 75 | import flare_emu # 导入flare_emu模块,用于模拟执行import idc # 导入idc模块,用于与IDA交互import idaapi # 导入idaapi模块,用于获取函数信息等import keypatch # 导入keypatch模块,用于汇编指令的修复# 定义一个函数,用于修复指定地址的指令def patch_one(address: int, new_instruction: str): """ 使用Keypatch修复指定地址的指令。 参数: address (int): 要修复的指令地址。 new_instruction (str): 新的汇编指令。 返回: bool: 如果修复成功返回True,否则返回False。 """ kp_asm = keypatch.Keypatch_Asm() # 初始化Keypatch汇编对象 if kp_asm.arch is None: # 检查Keypatch是否支持当前架构 print("ERROR: Keypatch无法处理此架构") return False # 解析新的汇编指令 assembly = kp_asm.ida_resolve(new_instruction, address) (encoding, count) = kp_asm.assemble(assembly, address) # 将汇编指令转换为机器码 if encoding is None: # 如果没有生成机器码,说明无需修复 print("Keypatch: 无需修复") return False # 将机器码转换为字节数据 patch_data = ''.join(chr(c) for c in encoding) patch_len = len(patch_data) # 获取机器码长度 kp_asm.patch(address, patch_data, patch_len) # 使用Keypatch进行修复 print(f"修复完成: {assembly}") # 输出修复的指令def myTargetCallBack(emu, address, argv, userData): """ 模拟执行时的回调函数,用于记录间接调用的目标地址。 参数: emu (flare_emu.EmuHelper): 模拟器对象。 address (int): 当前指令地址。 argv (list): 当前指令的参数。 userData (dict): 用户数据,用于存储间接调用的映射。 """ # 获取当前指令的反汇编字符串 code_str = idc.GetDisasm(address) # 提取BR指令使用的寄存器名 register_name = code_str.split(" ")[-1] # 输出当前地址和寄存器值 print(f"address = {hex(address)}, X* = {hex(emu.getRegVal(register_name))}") # 将当前地址和寄存器值存储到用户数据中 userData["br_map"][address] = emu.getRegVal(register_name)def anti_icall(): """ 主函数,用于处理间接调用(indirect call)的修复。 """ br_addr_list = [0x4006A0, 0x400724] # 初始化间接调用地址列表 eh = flare_emu.EmuHelper() # 初始化flare_emu模拟器 # 模拟执行指定范围内的代码,并记录间接调用的目标地址 eh.iterate(br_addr_list, targetCallback=myTargetCallBack, hookData={"br_map": {}}) # 遍历记录的间接调用地址,并修复为直接调用 for br_addr in eh.hookData["br_map"]: print(f"br_addr = {hex(br_addr)} {hex(eh.hookData['br_map'][br_addr])}") patch_one(br_addr, f"bl {hex(eh.hookData['br_map'][br_addr])}") |
效果验证
IDA 已经可以解析出函数 add 的地址
对抗加密块间的调用地址
混淆效果
IDA 打开 main_indbr 中的 add5 函数可以发现函数主体无法被解析
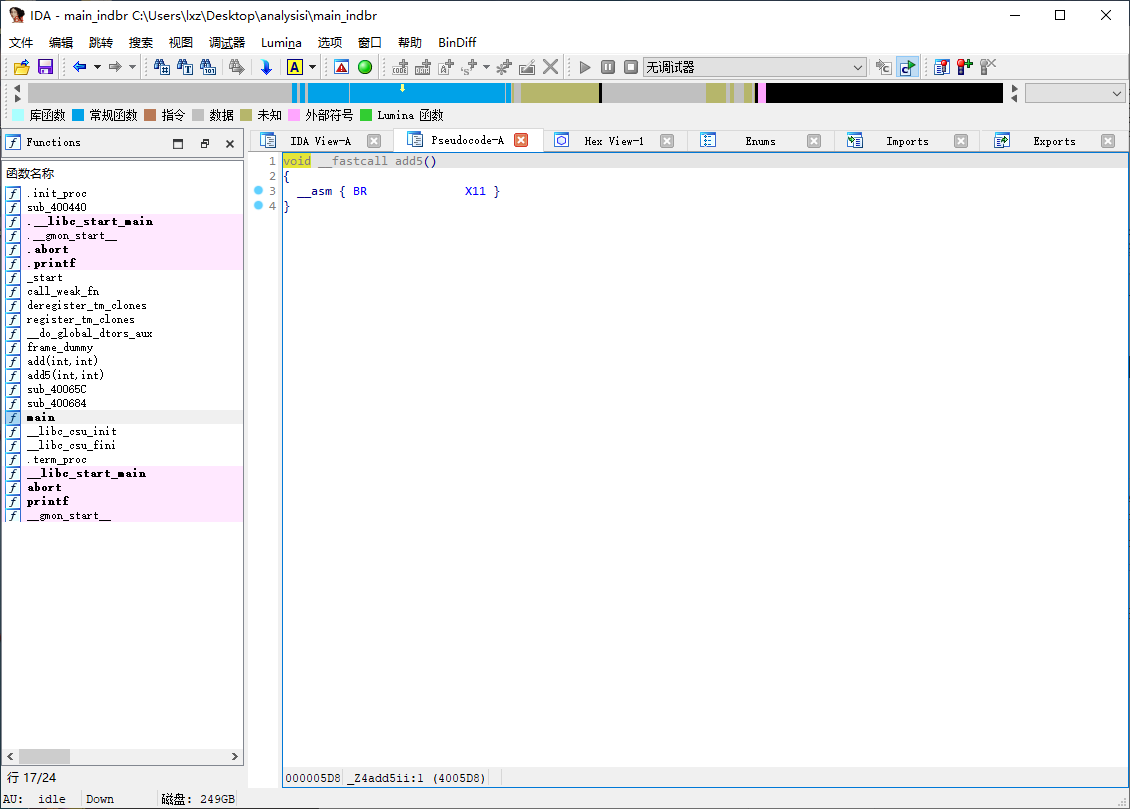
分析思路
这里我们可以发现原本的 BL 指令被替换成了 BLR 指令,不过这里就不能像 icall 那样粗暴的直接计算地址了,因为这里可能会涉及到多个分支的问题。
通过观察我发现一般只有两个分支,所以我这里的还原思路如下:
使用 flare_emu 的 emulateFrom 方法,从函数起始地址模拟执行到 BR 指令:
在模拟过程中,通过 my_instruction_hook 拦截指令,记录 CSEL 或 CSET 指令的地址,需要注意有两个分支。
根据
CSEL或CSET指令的类型,修复为条件跳转指令
示例代码
1 2 3 4 5 6 7 8 9 10 11 12 13 14 15 16 17 18 19 20 21 22 23 24 25 26 27 28 29 30 31 32 33 34 35 36 37 38 39 40 41 42 43 44 45 46 47 48 49 50 51 52 53 54 55 56 57 58 59 60 61 62 63 64 65 66 67 68 69 70 71 72 73 74 75 76 77 78 79 80 81 82 83 84 85 86 87 88 89 90 91 92 93 94 95 96 97 98 99 100 101 102 103 104 105 106 107 108 109 110 111 112 113 114 115 116 117 118 119 120 121 122 123 124 125 126 127 128 129 130 131 132 133 134 135 136 137 138 139 140 141 142 143 144 145 146 147 148 149 150 151 152 153 154 155 156 157 158 159 160 161 162 163 164 165 166 167 168 169 170 171 172 173 174 175 176 177 178 179 180 181 182 183 184 185 186 187 188 189 190 191 192 193 194 195 196 197 198 199 200 201 202 203 204 205 | import flare_emu # 导入flare_emu模块,用于模拟执行import idc # 导入idc模块,用于与IDA交互import idaapi # 导入idaapi模块,用于获取函数信息等import keypatch # 导入keypatch模块,用于汇编指令的修复# 定义一个函数,用于修复指定地址的指令def patch_one(address: int, new_instruction: str): kp_asm = keypatch.Keypatch_Asm() # 初始化Keypatch汇编对象 if kp_asm.arch is None: # 检查Keypatch是否支持当前架构 print("ERROR: Keypatch无法处理此架构") return False # 解析新的汇编指令 assembly = kp_asm.ida_resolve(new_instruction, address) (encoding, count) = kp_asm.assemble(assembly, address) # 将汇编指令转换为机器码 if encoding is None: # 如果没有生成机器码,说明无需修复 print("Keypatch: 无需修复") return False # 将机器码转换为字节数据 patch_data = ''.join(chr(c) for c in encoding) patch_len = len(patch_data) # 获取机器码长度 kp_asm.patch(address, patch_data, patch_len) # 使用Keypatch进行修复 print(f"修复完成: {assembly}") # 输出修复的指令def my_instruction_hook(uc, address, size, userData): import unicorn, re # 匹配CSEL指令和寄存器名称 match = re.search(r'CSEL\s+W(\w+),\s+W(\w+),\s+W(\w+),\s+LT', idc.GetDisasm(address)) if match: print('CSEL LT --> ', match.groups()[0], match.groups()[1], match.groups()[2]) userData["cse_addr"] = address # 根据 match.groups()[0] match.groups()[1] match.groups()[2] 输出 CSEL 指令的两个寄存器的名称和寄存器的值 reg_id1 = int(match.groups()[0]) reg_id2 = int(match.groups()[1]) reg_id3 = int(match.groups()[2]) reg_id1_value = uc.reg_read(unicorn.arm64_const.UC_ARM64_REG_X0 + reg_id1) reg_id2_value = uc.reg_read(unicorn.arm64_const.UC_ARM64_REG_X0 + reg_id2) reg_id3_value = uc.reg_read(unicorn.arm64_const.UC_ARM64_REG_X0 + reg_id3) print(f"x{reg_id1} = {hex(reg_id1_value)}, x{reg_id2} = {hex(reg_id2_value)}, x{reg_id3} = {hex(reg_id3_value)}") # 读取当前PSTATE的值 pstate_value = uc.reg_read(unicorn.arm64_const.UC_ARM64_REG_PSTATE) if userData["branch"] == 1: # 分支1,Z标志位置为 0 new_pstate_value = (pstate_value & ~(1 << 30)) else: # 分支2,Z标志位置为 1 new_pstate_value = (pstate_value & (1 << 30)) # 写回修改后的PSTATE值 uc.reg_write(unicorn.arm64_const.UC_ARM64_REG_PSTATE, new_pstate_value) # 匹配CSEL指令和寄存器名称 match = re.search(r'CSEL\s+W(\w+),\s+W(\w+),\s+W(\w+),\s+GT', idc.GetDisasm(address)) if match: print('CSEL GT --> ', match.groups()[0], match.groups()[1], match.groups()[2]) userData["cse_addr"] = address # 根据 match.groups()[0] match.groups()[1] match.groups()[2] 输出 CSEL 指令的两个寄存器的名称和寄存器的值 reg_id1 = int(match.groups()[0]) reg_id2 = int(match.groups()[1]) reg_id3 = int(match.groups()[2]) reg_id1_value = uc.reg_read(unicorn.arm64_const.UC_ARM64_REG_X0 + reg_id1) reg_id2_value = uc.reg_read(unicorn.arm64_const.UC_ARM64_REG_X0 + reg_id2) reg_id3_value = uc.reg_read(unicorn.arm64_const.UC_ARM64_REG_X0 + reg_id3) print(f"x{reg_id1} = {hex(reg_id1_value)}, x{reg_id2} = {hex(reg_id2_value)}, x{reg_id3} = {hex(reg_id3_value)}") # 读取当前PSTATE的值 pstate_value = uc.reg_read(unicorn.arm64_const.UC_ARM64_REG_PSTATE) if userData["branch"] == 1: # 分支1,Z标志位置为 0 new_pstate_value = (pstate_value & ~(1 << 30)) else: # 分支2,Z标志位置为 1 new_pstate_value = (pstate_value & (1 << 30)) # 写回修改后的PSTATE值 uc.reg_write(unicorn.arm64_const.UC_ARM64_REG_PSTATE, new_pstate_value) # 匹配CSET指令和寄存器名称 match = re.search(r'CSET\s+W(\w+),\s+LT', idc.GetDisasm(address)) if match: print('CSET --> ', match.groups()[0]) userData["cse_addr"] = address # 读取当前PSTATE的值 pstate_value = uc.reg_read(unicorn.arm64_const.UC_ARM64_REG_PSTATE) if userData["branch"] == 1: # 分支1,N标志位置为 0 new_pstate_value = (pstate_value & ~(1 << 31)) else: # 分支2,N标志位置为 1 new_pstate_value = (pstate_value & (1 << 31)) # 写回修改后的PSTATE值 uc.reg_write(unicorn.arm64_const.UC_ARM64_REG_PSTATE, new_pstate_value) # 匹配CSET指令和寄存器名称 match = re.search(r'CSET\s+W(\w+),\s+GT', idc.GetDisasm(address)) if match: print('CSGT --> ', match.groups()[0]) userData["cse_addr"] = address # 读取当前PSTATE的值 pstate_value = uc.reg_read(unicorn.arm64_const.UC_ARM64_REG_PSTATE) if userData["branch"] == 1: # 分支1,N标志位置为 0 new_pstate_value = (pstate_value & ~(1 << 31)) else: # 分支2,N标志位置为 1 new_pstate_value = (pstate_value & (1 << 31)) # 写回修改后的PSTATE值 uc.reg_write(unicorn.arm64_const.UC_ARM64_REG_PSTATE, new_pstate_value)def branch(start_addr, br_addr, branch_id): br_reg_name = idc.GetDisasm(br_addr).split(" ")[-1] # 提取BR指令使用的寄存器名 # start_addr = idaapi.get_func(br_addr).start_ea eh = flare_emu.EmuHelper() eh.emulateFrom(start_addr, instructionHook=my_instruction_hook, hookData={"branch":branch_id}, count=int((br_addr-start_addr)/4)) # 从当前地址开始模拟执行 br_reg_value = eh.getRegVal(br_reg_name) cse_addr = eh.getHookData()["cse_addr"] print(f"branch_{branch_id} {br_reg_name} = {hex(br_reg_value)}") return br_reg_name, br_reg_value, cse_addrdef fun_to_block(addr): import idc import ida_funcs import ida_bytes # 获取函数对象 func = ida_funcs.get_func(addr) if func: # 删除函数定义 ida_funcs.del_func(addr) print(f"已删除函数: {hex(addr)}") else: print(f"{hex(addr)} 处没有函数") # 确保字节被标记为代码 ida_bytes.del_items(addr, ida_bytes.DELIT_SIMPLE, 0) # 反汇编为代码块 idc.create_insn(addr) print(f"{hex(addr)} 现在已被设置为代码块")def anti_indbr(): br_addr_list = [0x400658, 0x4006AC] # 初始化间接调用地址列表 start_addr = idaapi.get_func(br_addr_list[0]).start_ea for br_addr in br_addr_list: if not idc.GetDisasm(br_addr).startswith("BR"): return print(f"br_addr = {hex(br_addr)}") # 输出BR指令地址 # 在代码块中找到 cse 系列指令,分别模拟两种分支下最后 BR 寄存器的值 br_reg_name1, br_reg_value1, cse_addr1 = branch(start_addr, br_addr, 1) br_reg_name2, br_reg_value2, cse_addr2 = branch(start_addr, br_addr, 2) print(f"branch_1 {br_reg_name1} = {hex(br_reg_value1)}, cse_addr1 = {hex(cse_addr1)}") print(f"branch_2 {br_reg_name2} = {hex(br_reg_value2)}, cse_addr2 = {hex(cse_addr2)}") # 将函数转为代码块,优化 IDA F5 的效果 fun_to_block(br_reg_value1) fun_to_block(br_reg_value2) # 这里只列了几个 case 分支 # CSET W9, LT if idc.GetDisasm(cse_addr1).startswith("CSET") and idc.GetDisasm(cse_addr1).endswith("LT"): patch_one(cse_addr1, f"B.GE {hex(br_reg_value1)}") patch_one(cse_addr1+4, f"B {hex(br_reg_value2)}") # CSET W9, GT elif idc.GetDisasm(cse_addr1).startswith("CSET") and idc.GetDisasm(cse_addr1).endswith("GT"): patch_one(cse_addr1, f"B.GT {hex(br_reg_value1)}") patch_one(cse_addr1+4, f"B {hex(br_reg_value2)}") # CSEL W9, W10, W11, LT elif idc.GetDisasm(cse_addr1).startswith("CSEL") and idc.GetDisasm(cse_addr1).endswith("LT"): patch_one(cse_addr1, f"B.LT {hex(br_reg_value1)}") patch_one(cse_addr1+4, f"B {hex(br_reg_value2)}") # CSEL W9, W10, W11,GT elif idc.GetDisasm(cse_addr1).startswith("CSEL") and idc.GetDisasm(cse_addr1).endswith("GT"): patch_one(cse_addr1, f"B.GT {hex(br_reg_value1)}") patch_one(cse_addr1+4, f"B {hex(br_reg_value2)}") |
效果验证
IDA 已经可以解析出函数 add5 的函数主体
对抗控制流平坦化
混淆效果
IDA 打开 main_indbr 中的 add5 函数可以发现函数逻辑难以理解

分析思路
控制流平坦化作为 ollvm 中最重要的 Pass,也是最难以还原的,我这里的还原思路如下:
1.1 识别基本块
- 使用 IDA 的 FlowChart API 遍历函数的所有基本块。
- 根据块结尾的指令特征判断块是否为真实块 。
- 首先,函数的首地址所在的块为真实块,因为这个块处理了函数的堆栈
- 其次,RET 结尾的代码块为真实块
- 剩余的真实块通过观察可知末端指令只有 [cmp, csel, str, b] 和 [mov, subs, str, b] 这两种组合,且都跳转到了同一个块
- 将真实块和虚假块分别存储到 real_blocks 和 fake_blocks 列表中。
2.2 模拟执行
- 使用 emulateRange 对函数进行模拟执行。
- 在模拟执行过程中,拦截分支指令(如 CSEL、CSET),根据状态寄存器的值记录当前状态下的跳转状态、是否有分支
- 比较麻烦的就是强行执行一些默认状态下不可达的块,这里通过在分支指令处通过修改状态寄存器来实现
- 记录每个基本块的后续跳转关系,并将当前块添加到上一个真实块的 behind_block 列表中
2.3 修复控制流
- 对于真实块:
- 如果只有一个后续块,直接修复为无条件跳转指令(
B)。 - 如果有两个后续块,根据条件修复为条件跳转指令(如
B.GE、B.GT等)。
- 如果只有一个后续块,直接修复为无条件跳转指令(
- 对于虚假块:
- 将其所有指令修复为
NOP,以清除无效代码。
- 将其所有指令修复为
示例代码
1 2 3 4 5 6 7 8 9 10 11 12 13 14 15 16 17 18 19 20 21 22 23 24 25 26 27 28 29 30 31 32 33 34 35 36 37 38 39 40 41 42 43 44 45 46 47 48 49 50 51 52 53 54 55 56 57 58 59 60 61 62 63 64 65 66 67 68 69 70 71 72 73 74 75 76 77 78 79 80 81 82 83 84 85 86 87 88 89 90 91 92 93 94 95 96 97 98 99 100 101 102 103 104 105 106 107 108 109 110 111 112 113 114 115 116 117 118 119 120 121 122 123 124 125 126 127 128 129 130 131 132 133 134 135 136 137 138 139 140 141 142 143 144 145 146 147 148 149 150 151 152 153 154 155 156 157 158 159 160 161 162 163 164 165 166 167 168 169 170 171 172 173 174 175 176 177 178 179 180 181 182 183 184 185 186 187 188 189 190 191 192 193 194 195 196 197 198 199 200 201 202 203 204 205 206 207 208 209 210 211 212 213 214 215 216 217 218 219 220 221 222 223 224 225 226 227 228 229 230 231 232 233 234 235 236 237 238 239 240 241 242 243 244 245 246 247 248 249 250 251 252 253 254 255 256 257 258 259 260 261 262 263 264 265 266 267 268 269 270 271 272 273 274 275 276 277 278 279 280 281 282 283 284 285 286 287 288 289 290 291 292 293 294 295 296 297 298 299 300 301 302 303 304 305 306 307 308 309 310 311 312 313 314 315 316 317 318 319 320 321 322 323 324 325 326 327 328 329 330 331 332 333 334 335 336 337 338 339 340 341 342 343 344 345 346 347 348 349 350 351 352 353 354 355 356 357 358 359 360 361 362 363 364 365 366 367 368 369 370 371 372 373 374 375 376 377 378 379 380 381 382 383 384 385 386 387 388 389 | import flare_emuimport idaapiimport idcimport unicorn.arm64_const# 定义一个类用于记录代码块信息class BlockInfo: def __init__(self, start_addr, end_addr): self.start_addr = start_addr # 块的起始地址 self.end_addr = end_addr # 块的结束地址 self.size = end_addr - start_addr # 块的大小 self.behind_block = {0: None, 1: None} # 后续块的映射,0表示条件不成立,1表示条件成立 self.csel_state = -1 # CSEL指令状态:-1表示没有CSEL指令,0表示条件不成立,1表示条件成立 def get_behind_block_num(self): """获取后续块的数量""" num = 0 if self.behind_block[0] is not None and self.behind_block[0] is not True: num += 1 if self.behind_block[1] is not None and self.behind_block[1] is not True: num += 1 return num def to_string(self): """返回块信息的字符串表示""" behind_block0 = hex(self.behind_block[0].start_addr) if self.behind_block[0] else "None" behind_block1 = hex(self.behind_block[1].start_addr) if self.behind_block[1] else "None" return f"addr:{hex(self.start_addr)} behind_block0:{behind_block0} behind_block1:{behind_block1}"# 定义一个类用于去除OLLVM控制流混淆class OLLVMDeobfuscator: def __init__(self, func_start): self.func_start = func_start # 函数起始地址 self.func_end = idc.find_func_end(func_start) # 函数结束地址 self.fake_blocks = [] # 存储虚假块 self.real_blocks = [] # 存储真实块 self.block_links = [] # 存储块之间的连接关系 self.branch_tasks = {} # 存储待处理的分支任务 # 获取函数的控制流图 self.flowchart = idaapi.FlowChart(idaapi.get_func(func_start)) def analyze_blocks(self): """分析函数中的基本块,区分真实块和虚假块""" for block in self.flowchart: block_info = BlockInfo(block.start_ea, block.end_ea - 4) # 创建块信息对象 if block_info.size == 0: continue # 判断块是否为真实块 if self.is_real_block(block_info): self.real_blocks.append(block_info) else: self.fake_blocks.append(block_info) # 打印并标记真实块和虚假块 for block_info in self.real_blocks: print(f"真实块: {hex(block_info.start_addr)} - {hex(block_info.end_addr)}") self.set_block_color(block_info.start_addr, block_info.end_addr + 4, 0x00ff00) # 绿色 for block_info in self.fake_blocks: print(f"虚假块: {hex(block_info.start_addr)} - {hex(block_info.end_addr)}") self.set_block_color(block_info.start_addr, block_info.end_addr + 4, 0x00ffff) # 黄色 def is_real_block(self, block_info): """判断块是否为真实块""" # 如果是函数的入口块,则为真实块 if idaapi.get_func(block_info.start_addr).start_ea == block_info.start_addr: return True # 如果块以RET指令结束,则为真实块 if idc.GetDisasm(block_info.end_addr).startswith("RET"): return True # 根据块的指令模式判断是否为真实块 disasm1 = idc.GetDisasm(block_info.end_addr - 12) disasm2 = idc.GetDisasm(block_info.end_addr - 8) disasm3 = idc.GetDisasm(block_info.end_addr - 4) disasm4 = idc.GetDisasm(block_info.end_addr) if disasm1.startswith("CMP") and disasm2.startswith("CSEL") and disasm3.startswith("STR") and disasm4.startswith("B"): return True if disasm1.startswith("MOV") and disasm2.startswith("SUBS") and disasm3.startswith("STR") and disasm4.startswith("B"): return True return False def set_block_color(self, start_ea, end_ea, color): """设置块的颜色""" for ea in range(start_ea, end_ea): idc.set_color(ea, idc.CIC_ITEM, color) def get_NZCV(self, uc): """获取 NZCV 标志位""" pstate_value = uc.reg_read(unicorn.arm64_const.UC_ARM64_REG_PSTATE) N = (pstate_value >> 31) & 1 Z = (pstate_value >> 30) & 1 C = (pstate_value >> 29) & 1 V = (pstate_value >> 28) & 1 return N, Z, C, V def set_NZCV(self, uc, N=None, Z=None, C=None, V=None): """设置 NZCV 标志位""" pstate_value = uc.reg_read(unicorn.arm64_const.UC_ARM64_REG_PSTATE) if N is not None: pstate_value = (pstate_value & ~(1 << 31)) | (N << 31) if Z is not None: pstate_value = (pstate_value & ~(1 << 30)) | (Z << 30) if C is not None: pstate_value = (pstate_value & ~(1 << 29)) | (C << 29) if V is not None: pstate_value = (pstate_value & ~(1 << 28)) | (V << 28) uc.reg_write(unicorn.arm64_const.UC_ARM64_REG_PSTATE, pstate_value) def is_real_block_start(self, address): """判断是否为真实块的起始地址""" for block in self.real_blocks: if address == block.start_addr: return block return None def is_real_block_end(self, address): """判断是否为真实块的结束地址""" for block in self.real_blocks: if address == block.end_addr: return block return None def find_real_block_by_address(self, address): """根据地址查找所属的真实块""" for block in self.real_blocks: if block.start_addr <= address <= block.end_addr: return block return None def handle_real_block_start(self, uc, address, block_info): """处理真实块的起始地址""" if self.is_real_block_start(address): print(f"真实块起始地址: {hex(address)}") self.block_links.append(block_info) def handle_csel_lt(self, uc, address, block_info): """处理 CSEL LT 指令""" if idc.GetDisasm(address).startswith("CSEL") and idc.GetDisasm(address).endswith("LT"): print(f"处理 CSEL LT 指令: {hex(block_info.start_addr)}") if self.branch_tasks.get(address): # pass if self.branch_tasks[address]["branch_true"] == False: bl_addr = int(idc.GetDisasm(block_info.end_addr).split("loc_")[1], 16) print(f"强制条件成立,跳转 {hex(bl_addr)}") # 将 N、 V 设置为不相等 self.set_NZCV(uc, N=1, V=0) block_info.csel_state = 1 self.branch_tasks[address]["branch_true"] = True elif self.branch_tasks[address]["branch_false"] == False: bl_addr = block_info.start_addr print(f"强制条件不成立,不跳转 {idc.GetDisasm(bl_addr)}") # # 将 N、 V 设置为相等 self.set_NZCV(uc, N=1, V=1) block_info.csel_state = 0 self.branch_tasks[address]["branch_false"] = True else: N, Z, C, V = self.get_NZCV(uc) if N != V: # 如果 N 和 V 不相等,表示条件成立 bl_addr = int(idc.GetDisasm(block_info.end_addr).split("loc_")[1], 16) print(f"自然条件成立,跳转 {hex(bl_addr)}") block_info.csel_state = 1 self.block_links[-1].behind_block[1] = True self.branch_tasks[address] = {"branch_true":True, "branch_false":False} else: # 如果 N 和 V 相等,表示条件不成立 bl_addr = block_info.start_addr print(f"自然条件不成立,不跳转 {idc.GetDisasm(bl_addr)}") block_info.csel_state = 0 self.block_links[-1].behind_block[0] = True self.branch_tasks[address] = {"branch_true":False, "branch_false":True} def handle_csel_gt(self, uc, address, block_info): """处理 CSEL GT 指令""" if idc.GetDisasm(address).startswith("CSEL") and idc.GetDisasm(address).endswith("GT"): print(f"处理 CSEL GT 指令: {hex(block_info.start_addr)}") if self.branch_tasks.get(address): # pass if self.branch_tasks[address]["branch_true"] == False: bl_addr = int(idc.GetDisasm(block_info.end_addr).split("loc_")[1], 16) print(f"强制条件成立,跳转 {hex(bl_addr)}") # 将 Z 设置为 0, N V 设置为相等 self.set_NZCV(uc, Z=0, N=1, V=1) block_info.csel_state = 1 self.branch_tasks[address]["branch_true"] = True elif self.branch_tasks[address]["branch_false"] == False: bl_addr = block_info.start_addr print(f"强制条件不成立,不跳转 {idc.GetDisasm(bl_addr)}") # 将 Z 设置为 1 self.set_NZCV(uc, Z=1) block_info.csel_state = 0 self.branch_tasks[address]["branch_false"] = True else: N, Z, C, V = self.get_NZCV(uc) if Z == 0 and N == V: # 如果 N 和 V 不相等,表示条件成立 bl_addr = int(idc.GetDisasm(block_info.end_addr).split("loc_")[1], 16) print(f"自然条件成立,跳转 {hex(bl_addr)}") block_info.csel_state = 1 self.block_links[-1].behind_block[1] = True self.branch_tasks[address] = {"branch_true":True, "branch_false":False} else: # 如果 N 和 V 相等,表示条件不成立 bl_addr = block_info.start_addr print(f"自然条件不成立,不跳转 {idc.GetDisasm(bl_addr)}") block_info.csel_state = 0 self.block_links[-1].behind_block[0] = True self.branch_tasks[address] = {"branch_true":False, "branch_false":True} def handle_real_block_end(self, uc, address, block_info): """处理真实块的结束地址""" if idc.GetDisasm(address + 4).startswith("RET"): print(f"提前处理返回指令: {hex(address)}") if len(self.block_links) > 1: # 将当前块的地址,添加到上一个真实块的 behind_block 中 before_block = self.block_links[-2] if before_block.csel_state == 1: print(f"当前块的CSEL:{hex(address)} {before_block.csel_state} {hex(before_block.start_addr)} --> {hex(block_info.start_addr)}") if before_block.behind_block[1] == None or before_block.behind_block[1] == True: before_block.behind_block[1] = block_info elif before_block.csel_state == 0: print(f"当前块的CSEL:{hex(address)} {before_block.csel_state} {hex(before_block.start_addr)} --> {hex(block_info.start_addr)}") if before_block.behind_block[0] == None or before_block.behind_block[0] == True: before_block.behind_block[0] = block_info elif before_block.csel_state == -1: print(f"当前块的CSEL:{hex(address)} {before_block.csel_state} {hex(before_block.start_addr)} --> {hex(block_info.start_addr)}") before_block.behind_block[1] = block_info # 如果是这是一个真实块的结束地址,那么获取这个真实块 if self.is_real_block_end(address): print(f"真实块结束地址: {hex(address)}") if len(self.block_links) > 1: # 将当前块的地址,添加到上一个真实块的 behind_block 中 before_block = self.block_links[-2] if before_block.csel_state == 1: print(f"当前块的CSEL:{hex(address)} {before_block.csel_state} {hex(before_block.start_addr)} --> {hex(block_info.start_addr)}") if before_block.behind_block[1] == None or before_block.behind_block[1] == True: before_block.behind_block[1] = block_info elif before_block.csel_state == 0: print(f"当前块的CSEL:{hex(address)} {before_block.csel_state} {hex(before_block.start_addr)} --> {hex(block_info.start_addr)}") if before_block.behind_block[0] == None or before_block.behind_block[0] == True: before_block.behind_block[0] = block_info elif before_block.csel_state == -1: print(f"当前块的CSEL:{hex(address)} {before_block.csel_state} {hex(before_block.start_addr)} --> {hex(block_info.start_addr)}") before_block.behind_block[1] = block_info def my_instruction_hook(self, uc, address, size, userData): """指令钩子函数""" block_info = self.find_real_block_by_address(address) if block_info is None: return # 处理真实块的起始地址 self.handle_real_block_start(uc, address, block_info) # 处理 CSEL 指令 self.handle_csel_lt(uc, address, block_info) self.handle_csel_gt(uc, address, block_info) # 处理真实块的结束地址 self.handle_real_block_end(uc, address, block_info) def simulate_start(self): """模拟执行函数的起始部分""" # 这里多执行几次,避免遗漏代码块 eh = flare_emu.EmuHelper() for i in range(0, 3): eh.emulateRange(self.func_start, self.func_end, skipCalls=True, instructionHook=self.my_instruction_hook) for block_info in self.real_blocks: print(block_info.to_string()) def patch_blocks(self): """修复虚假块和真实块的跳转指令""" for block_info in self.real_blocks: # 跳过返回块 if idc.GetDisasm(block_info.end_addr).startswith("RET"): continue # 如果只有一个后续块,直接跳转 if block_info.get_behind_block_num() == 1: patch_addr = block_info.end_addr jump_instruction = f"B {hex(block_info.behind_block[1].start_addr)}" self.patch_one(patch_addr, jump_instruction) # 如果有两个后续块,根据条件跳转 elif block_info.get_behind_block_num() == 2: patch_addr = block_info.end_addr - 8 if idc.GetDisasm(patch_addr).startswith("CSEL") and idc.GetDisasm(patch_addr).endswith("LT"): jump_instruction = f"B.GE {hex(block_info.behind_block[0].start_addr)}" elif idc.GetDisasm(patch_addr).startswith("CSEL") and idc.GetDisasm(patch_addr).endswith("GT"): jump_instruction = f"B.GT {hex(block_info.behind_block[0].start_addr)}" self.patch_one(patch_addr, jump_instruction) patch_addr = block_info.end_addr - 4 jump_instruction = f"B {hex(block_info.behind_block[1].start_addr)}" self.patch_one(patch_addr, jump_instruction) # 修复虚假块为NOP for block_info in self.fake_blocks: for patch_addr in range(block_info.start_addr, block_info.end_addr, 4): self.patch_one(patch_addr, "nop") def patch_one(self, address: int, new_instruction: str): """修复指定地址的指令""" import keypatch kp_asm = keypatch.Keypatch_Asm() if kp_asm.arch is None: print("ERROR: Keypatch无法处理此架构") return False # 解析新的汇编指令 assembly = kp_asm.ida_resolve(new_instruction, address) encoding, count = kp_asm.assemble(assembly, address) if encoding is None: print("Keypatch: 无需修复") return False # 应用修复 patch_data = ''.join(chr(c) for c in encoding) kp_asm.patch(address, patch_data, len(patch_data)) print(f"{hex(address)} 修复完成: {assembly}") def run(self): """运行去混淆流程""" print("开始分析基本块...") self.analyze_blocks() print("开始模拟执行...") self.simulate_start() print("开始修复指令...") self.patch_blocks() print("OLLVM 控制流混淆去除完成!")def deobfuscate_ollvm(): """入口函数""" func_start = 0x04005D8 # 设置函数起始地址 deobfuscator = OLLVMDeobfuscator(func_start) deobfuscator.run() |
效果验证
IDA 已经可以解析出函数 add5 的函数逻辑
总结
通过本次学习和实践,笔者对 OLLVM 的编译、使用以及其混淆技术有了更深入的理解。具体来说:
- 编译与使用:通过编译 OLLVM 并对代码进行混淆,熟悉 OLLVM 的基本使用流程,并验证了其混淆效果。
- 混淆技术分析:通过分析 OLLVM 的控制流平坦化技术,了解了其通过调度器增加代码复杂性的实现方式。
- 去混淆实践:结合 IDA Pro 和 Unicorn 模拟器等工具,成功去除了 OLLVM 的混淆逻辑,恢复了代码的可读性。
这次学习让笔者认识到,面对复杂的混淆技术,工具的选择和分析思路的清晰性至关重要。同时,实践中也让我意识到,混淆技术虽然强大,但并非不可破解。希望本篇笔记能够为其他研究 OLLVM 的同学提供一些参考和帮助。
参考资料
附件
更多【Android安全- OLLVM 攻略笔记】相关视频教程:www.yxfzedu.com
相关文章推荐
- CTF对抗-lua 逆向学习 & RCTF picstore 还原代码块 - Android安全CTF对抗IOS安全
- Android安全-如何修改unity HybridCLR 热更dll - Android安全CTF对抗IOS安全
- 软件逆向-浅谈编译器对代码的优化 - Android安全CTF对抗IOS安全
- 二进制漏洞-年终CLFS漏洞汇总分析 - Android安全CTF对抗IOS安全
- 软件逆向-自动化提取恶意文档中的shellcode - Android安全CTF对抗IOS安全
- 二进制漏洞-铁威马TerraMaster CVE-2022-24990&CVE-2022-24989漏洞分析报告 - Android安全CTF对抗IOS安全
- 4-seccomp-bpf+ptrace实现修改系统调用原理(附demo) - Android安全CTF对抗IOS安全
- 二进制漏洞-Windows内核提权漏洞CVE-2018-8120分析 - Android安全CTF对抗IOS安全
- CTF对抗-Hack-A-Sat 2020预选赛 beckley - Android安全CTF对抗IOS安全
- CTF对抗-]2022KCTF秋季赛 第十题 两袖清风 - Android安全CTF对抗IOS安全
- CTF对抗-kctf2022 秋季赛 第十题 两袖清风 wp - Android安全CTF对抗IOS安全
- Pwn-(pwn零基础入门到进阶)第一章 二进制文件 & 4 动态链接 - Android安全CTF对抗IOS安全
- Pwn-(pwn零基础入门到进阶)第一章 二进制文件 & 3 静态链接 - Android安全CTF对抗IOS安全
- CTF对抗-22年12月某春秋赛题-Random_花指令_Chacha20_RC4 - Android安全CTF对抗IOS安全
- Pwn-(pwn零基础入门到进阶)第一章 二进制文件 & 2 ELF文件格式 - Android安全CTF对抗IOS安全
- Pwn-从NCTF 2022 ezshellcode入门CTF PWN中的ptrace代码注入 - Android安全CTF对抗IOS安全
- 编程技术-开源一个自己写的简易的windows内核hook框架 - Android安全CTF对抗IOS安全
- 编程技术-拦截Windows关机消息 - Android安全CTF对抗IOS安全
- CTF对抗-KCTF2022秋季赛 第八题 商贸往来 题解 - Android安全CTF对抗IOS安全
- 软件逆向-分析某游戏驱动保护的学习历程 - Android安全CTF对抗IOS安全
2):严禁色情、血腥、暴力
3):严禁发布任何形式的广告贴
4):严禁发表关于中国的政治类话题
5):严格遵守中国互联网法律法规
6):有侵权,疑问可发邮件至service@yxfzedu.com
- 编程技术-使用requests库解决Session对象设置超时的问题
- 容器-Docker - MySQL Database is uninitialized and password option is not specified
- r语言-Android R.fraction
- 编辑器-『Vscode 自定义折叠代码』
- hive-2023.11.14 hivesql的容器,数组与映射
- 编程技术-第9章 读写文件
- 编程技术-Python 3.6.10 中的 requests 库 TLS 1.2 强制使用问题及解决方案
- 编程技术-手写LASSO回归python实现
- java-ModuleNotFoundError_ No module named ‘Crypto‘
- 编程技术-App分发的原理ipa分发系统需求